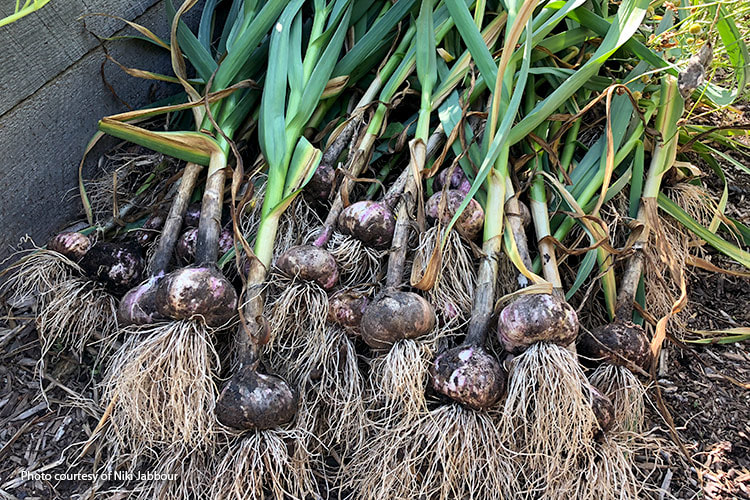
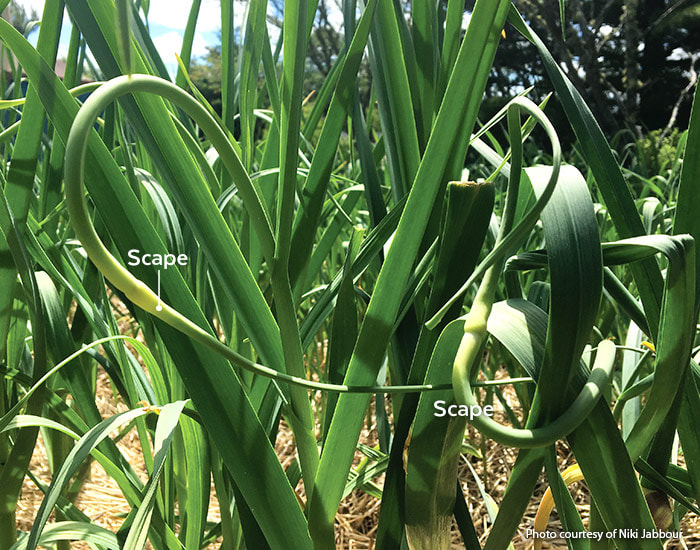
by Judy Kautz, OSU Extension Master GardenerThere are many reasons to grow your own garlic. First, it’s really easy to do. It is a good idea for new vegetable gardeners to include a patch of garlic. The plants are bothered by few pests and diseases; even the deer and rabbits that nibble on other crops rarely venture into the garlic patch. It’s also extremely low maintenance, requiring little fussing during the growing season. The best reason to plant garlic, however, is flavor. Home grown cloves are packed with a depth of flavor that you’ll never find with supermarket varieties. Garlic plants are bothered by few pests and diseases; even the deer and rabbits that nibble on other crops rarely venture into the garlic patch. And while garlic cloves can technically be planted in early spring, autumn is the best time to plant if you want really big bulbs. Time your planting for about four to six weeks before the ground is expected to freeze (traditionally around Halloween). This gives the cloves time to set roots before the arrival of winter. Niki Jabbour of Garden Gate magazine gives us an excellent summary on growing garlic. For big bulbs, garlic is best planted in autumn, about four to six weeks before the first expected frost. Break apart the cloves and sort them - the biggest for planting and the rest for the kitchen. Garlic can be grown almost anywhere in North America, from USDA zone 2 and warmer, although certain varieties do better in very cold regions. There are two main types of garlic: hardneck and softneck. Hardneck garlic produces a long flowering stalk, called a “scape,” in early summer. Beneath the soil, a single row of cloves develops around this central stalk. Hardneck garlic produces fewer cloves per bulb than softneck varieties, but each individual clove is larger, and many believe it to be more flavorful. Hardneck types are also usually more winter hardy than softneck garlic and are therefore the garlic of choice for short-season gardeners. Once harvested and cured, hardneck garlic stores for up to six months. Clip hardneck garlic scapes when they look like this to get bigger garlic bulbs. Softneck garlic is not usually as winter hardy as hardneck garlic and is often grown in milder regions. The bulbs are packed with cloves — sometimes more than 20 in a bulb! — that range in size from small to large. They do not produce a central scape, but instead have soft, flexible stems and leaves. This is why you’ll sometimes see softneck garlic braided for storage. And speaking of storage, softneck garlic stores very well, with the cloves remaining firm and flavorful for up to a year.
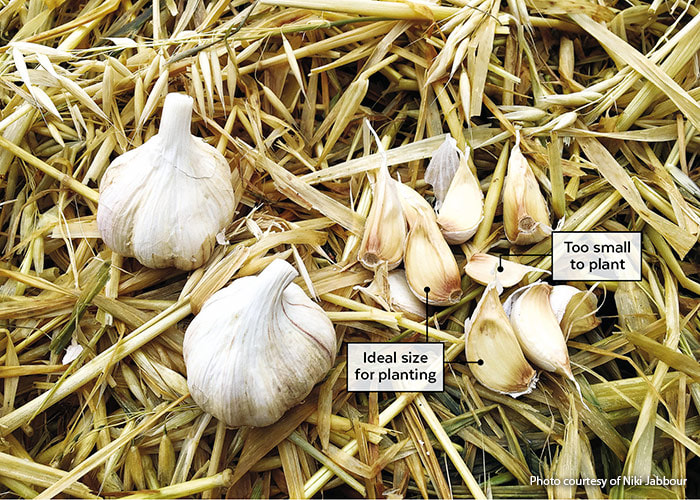
Where do you buy garlic for planting? There are three places to buy garlic for planting: your local garden center, the farmers market or an online catalog. Don’t buy garlic from the supermarket, as it may not be the right type for our climate and could also have been treated with a sprout inhibitor. If buying garlic locally, choose plump bulbs with no brown spots or mold. As long as bulbs were grown locally, any you buy at the farmers market will be fine in your garden. When choosing garlic to grow, don’t be shy about trying different varieties. There are hundreds of hardneck garlic varieties and dozens of softneck ones available to gardeners. While all taste like garlic, there are subtle flavor and pungency differences between types and varieties. How do you grow your own garlic? Garlic grows best in a site with at least six hours of sun each day. It also needs well-draining soil. Before planting, loosen the soil and dig in 1 to 2 inches of compost or aged manure to improve the soil. Once the garden is prepped, gently break the bulbs into individual cloves. Separate varieties into different containers. Don’t plant naked cloves! Leave the papery covering intact when you plant as it protects the cloves from potentially damaging microbes. Does clove size matter? The smallest cloves won’t size up into large bulbs. Set these aside to be taken to the kitchen. Also take a close look at the largest cloves: Sometimes you can see that they’ve split in two within their papery husk. If planted, they’ll form two side-by-side plants and this can result in stunted bulbs. So also toss large split cloves into the kitchen basket. Plant garlic in a grid pattern, spacing the cloves 6 inches apart and planting them 2 to 3 inches deep. After the bed has been planted, water well and top dress with a slow-release organic bulb fertilizer. Then mulch the soil with a 3-inch-deep layer of shredded leaves or straw. This reduces weed growth and insulates the bed for winter. Caring for your garlic should include feeding. As the weather warms in spring, you’ll notice green garlic shoots emerging from the mulch. At this point, apply a balanced granular organic fertilizer. Garlic appreciates a steady supply of nutrients, and feeding the plants results in bigger bulbs. This initial feeding can be followed up with an application of a liquid organic fertilizer, such as fish emulsion, when the garlic scapes are removed (on hardneck types) in mid- to late spring. With regard to watering, if there has been no rain, deep water the bed once a week with 1 to 2 inches of water. You can use a watering wand to hand water or snake a soaker hose through your garlic patch. While garlic growing problems are rare, keep an eye out for white rot, a fungal disease that affects onions and garlic. The first sign is yellowing leaves or stunted growth with the bulbs failing to develop well. Crop rotation and buying disease-free planting stock are the best way to avoid white rot. No matter if you’re growing softneck or hardneck garlic, it’s time to harvest when half of the leaves have yellowed. Use a garden fork to loosen the soil and gently lift the bulbs. This reduces damage, which could shorten storage life. Brush off soil clumps clinging to the roots with your gloves. Before you store homegrown garlic, it needs to cure. Curing helps develop the flavor and prepare the bulbs for long-term storage. Here’s how to do it: Hang the plants, with the foliage still attached, in a room, shed or site that is out of direct sunlight, sheltered from rain, and well ventilated. A temperature in the range of 75 to 80 degrees F is ideal. If you have a laundry rack, use it to hang the bulbs. You can also lay them flat on a mesh screen or newspapers, flipping them over every day or two so they cure evenly for two weeks. After they’ve cured, clean the bulbs by trimming the leaves and roots. I leave a 2-inch stem and trim the roots to about 1 inch. I also remove the outer wrapper if it’s very dirty. Place the bulbs in a single layer in a box, basket or hang in mesh bags. Store garlic in a cool, well-ventilated room that is 60 to 65 degrees F. A dry basement is ideal, but you can also keep it in a pantry or storage room. If you don’t have a good spot to store garlic, you can freeze peeled cloves on a parchment-lined tray. Once they’re frozen, bag them up and store in the freezer. Given its essential status in the kitchen, every garden needs a patch of garlic. It’s easy to grow, reliable and delicious. No space for a veggie garden? Tuck garlic cloves in ornamental beds, where the pungent aroma of the plants may even chase away insects and critters. Give garlic a try!
0 Comments
|
Welcome to Dishing the Garden Dirt!
|


 RSS Feed