by Judy Kautz, OSU Extension Master GardenerIt’s Memorial Day weekend, and a great time to think about decorating your landscape for weekend visitors. One way to brighten up your garden or patio as a salute to Memorial Day is to create a patriotic salute to those who fought for America. Why not show your patriotism with a festive red, white and blue container for your table or patio? Or better yet, plant a patriotic flower bed with red, white and blue flowers that will brighten up any landscape for Memorial Day! Assembling a patriotic container is very easy and inexpensive as well; here are some step-by-step instructions for creating a lovely patriotic pot. First, find a large container with good drainage holes that is at least 18 inches wide. It doesn’t have to be a fancy pot – anything left over in your garden can be festive. If your pot is deep and you don’t want to spend a fortune in potting soil, fill the bottom third of your pot with crushed Styrofoam or empty plastic soda bottles (lids on). This will also help to keep the weight of the finished pot to a manageable level so it can be moved. Next, add a layer of potting soil, leaving room at the top for your plants. 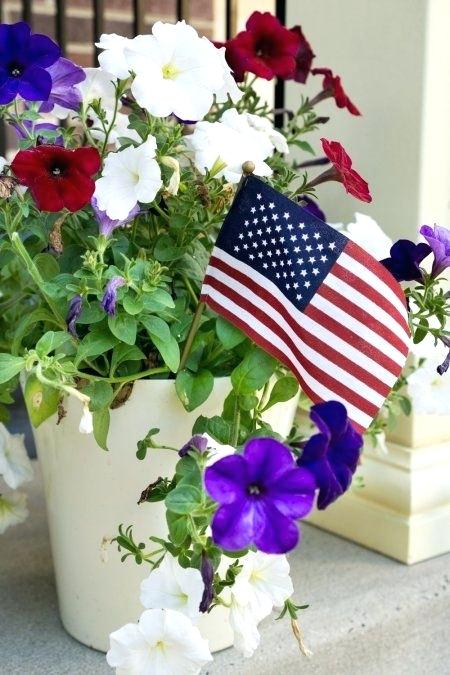 Choosing red, white, and blue plants and adding an American flag to a container creates a stunning display for your patio or picnic table. Choosing red, white and blue plants for your container is not difficult; there are many plants that will work just fine and create a lovely patriotic display. For red plants, try geraniums, petunias, annual salvia, verbena, pentas or celosia for sun, or begonias and impatiens for shade. White flowers are readily available as well, including petunias, zinnias, geraniums, phlox and cosmos for sun, and begonias and impatiens for shade. Finding blue flowers is a bit more challenging, but blue daze, ageratum and salvia, all sun-loving, come closest. One really true blue flower you might want to try is the balloon flower! You can also use deep purple petunias and verbena as well as lobelia (heat-loving variety) for a close-to-blue option. For a nice contrast, you can use green leafed plants like coleus and dusty miller for fillers and insert your red, white and blue flowers into the pot with them. Finally, decide how you want to arrange your plants, place them on top of the soil in the pot and fill in with more soil around the plants. Water your pot thoroughly after planting and place in a sunny or shady spot in your garden, or use your pot as a centerpiece for your picnic table. 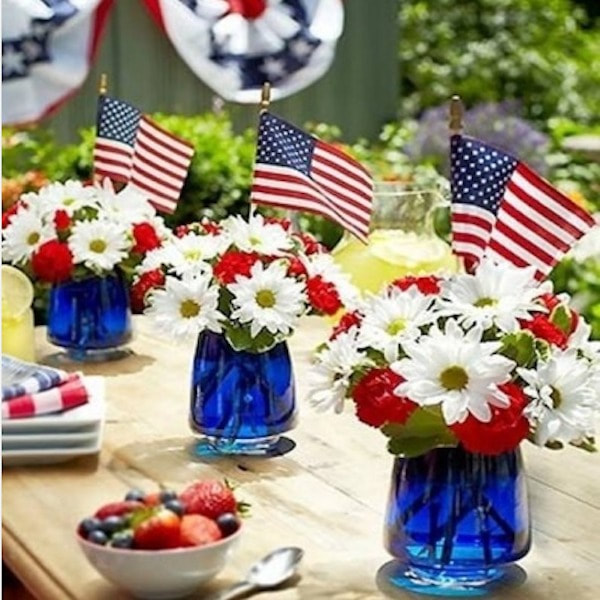 Here's an easy way to create centerpieces - use water dyed blue and combine with red and white flowers and American flag - stunning! There are many other possibilities to create a patriotic atmosphere. Choose vessels that are red and blue and plant them with only white flowers. Tie a red, white and blue ribbon around your pots to further emphasize the colors. Insert a flag in your pots for an added touch; small flags are readily available at local craft or dollar stores and they are usually inexpensive. In fact, if you have other pots arranged in your yard or patio, place small flags or colorful, patriotic pinwheels in the pots for a striking display. With this option, it doesn’t matter what colors of plants and flowers you have in your pots, as the flags or pinwheels give a patriotic flair. For all your containers, remember to check them for water; plants in pots dry out faster and will need frequent watering on hot days. 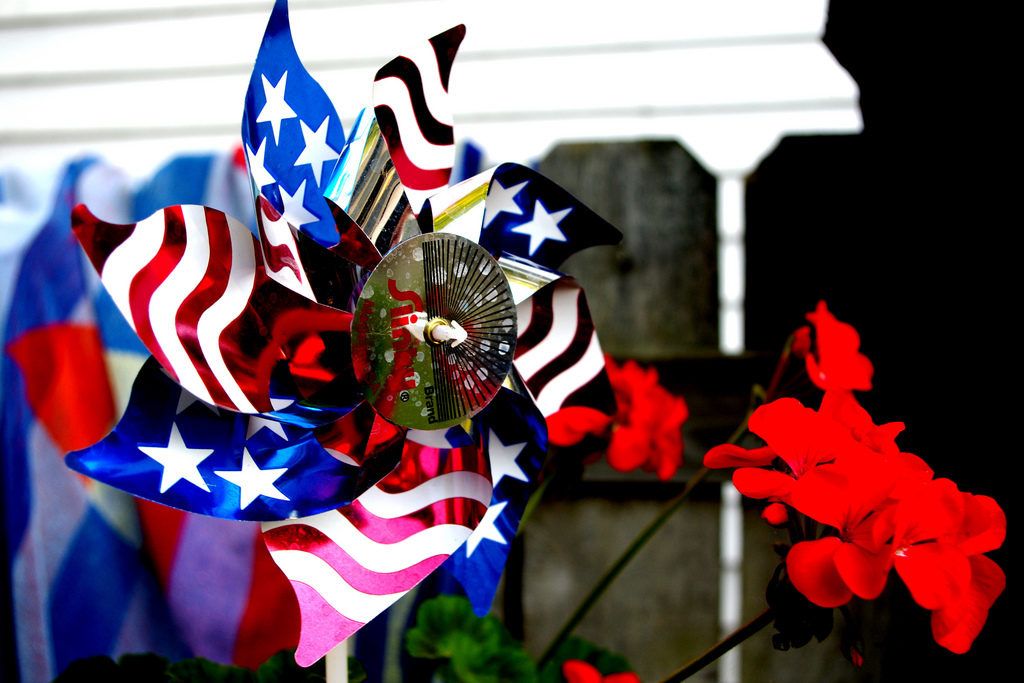 Use festive pinwheels to decorate any pot or vase! If you want to create a striking landscape for our patriotic holidays, try planting a patriotic garden bed instead of a planter. You can plant your patriotic colored plants in rows or sections, depending on your preference. Try these combinations: 1) Red Sweet William, White Angelonia (summer snapdragon) and Blue Daze, all heat-tolerant and sun-loving; 2) Red Tropical Sage, White Vinca and Blue Trailing Lobelia is another good combination, although lobelia may be difficult to find this late in the season; 3) Choose Red Penta, White Lantana and Blue Sage for another striking grouping in a garden bed. Patriotic garden beds can be a stunning addition to any home!
Show your American pride by creating a patriotic container or garden bed to place in a conspicuous spot in your landscape. You’ll be delighted with the results!
0 Comments
by Judy Kautz, OSU Extension Master GardenerHellebores are some of the first flowers to pop-up in spring. Not only is this perennial easy to grow but they come in a surprising array of new colors! There’s a lot happening in the world of hellebores. Recent breeding has introduced new colors, never-before-seen shapes and even longer bloom times for these nearly perfect perennials. Perhaps all this renewed interest in hellebores is because they’re so easy to grow. Perhaps it’s because they bloom way before anything else — allowing you fresh-picked bouquets even in winter. Or perhaps it’s simply because gardeners find their jewel tones so gosh-darn hard to resist. “Their allure certainly arises from their precocious bloom time,” says C. Colston Burrell, author of Hellebores: A Comprehensive Guide. “Gardeners yearn for year-round bloom, and hellebores deliver a dose of spring in the winter months. The flowers are colorful and borne in profusion. They are also long-lasting. Because the showy parts of the flowers are sepals, not petals, they do not fade and shrivel like petals would. The color may persist for several months, carrying the bloom period well into spring.” Hellebores is often called the rose of winter. The most commonly grown type of hellebore is the diverse group of part shade-loving hybrids known as the Lenten or winter rose. Breeding has produced a wide range of intriguing hellebores. The flowers tend to nod downward (to protect the pollen) and are up to 3 inches across, typically in shades of white, rose, green or purple. Newer hellebore hybrids now have spotted flowers and pointed petals; others are double-flowered or bicolors or even streaked. New leaves emerge at bloom time, and plants grow into an excellent glossy evergreen ground cover. 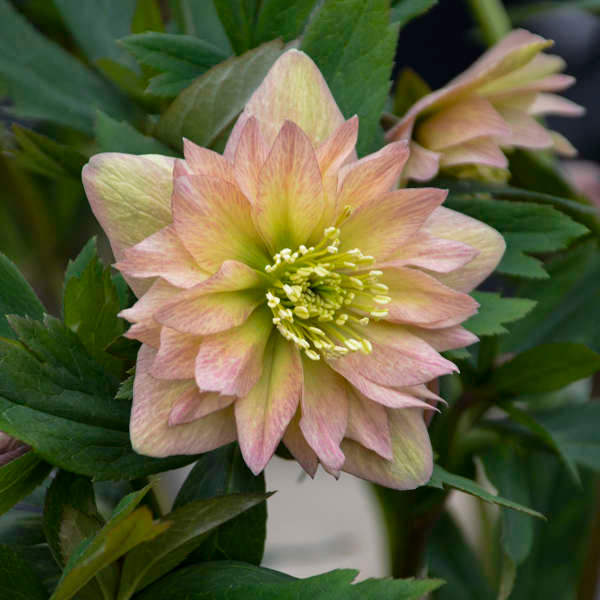 'Mother of the Bride' hellebore (Helleborus x hybridus) is a perennial with a double apricot flowers with a light pink picotee edge. It needs part to full shade, and grows 18 to 24 in tall and wide. It is cold hardy in USDA zones 4 to 9. In the landscape Hellebores provide contrast in almost any companion planting. That’s because they set the stage for later-blooming tulips and daffodils, but the hellebore’s sturdy foliage remains to camouflage the dying foliage of the spring-blooming bulbs. Try planting hellebores on a slope, hillside, or in a raised bed where their blossoms are better appreciated. “Since hellebores generally nod,” Colston explains, “planting them on a slope allows you to see the inside of the flowers, which are more alluring in color and pattern than the backs of the flowers. The reason the flowers nod is to protect the reproductive structures — stamens and pistils — from frost damage.” Throughout most of North America, hellebores wait until the worst of winter is over to begin blooming around February and March, when the snow has melted or is just beginning to melt. All the more reason you should want to have plenty of hellebores on hand to properly herald spring’s long-awaited arrival. Garden Gate offers some tips for growing hellebores: If you want to divide your hellebores or need to transplant, do so in the fall. Dig up the whole plant, wash off the soil, then divide with a sharp knife between growth buds. Leave at least three of these dormant little shoots on each of the divisions. Hellebores frequently seed in large numbers around a parent plant, which can be dug up and transplanted. However, these hybrids will not be the same as the parent in color and form. 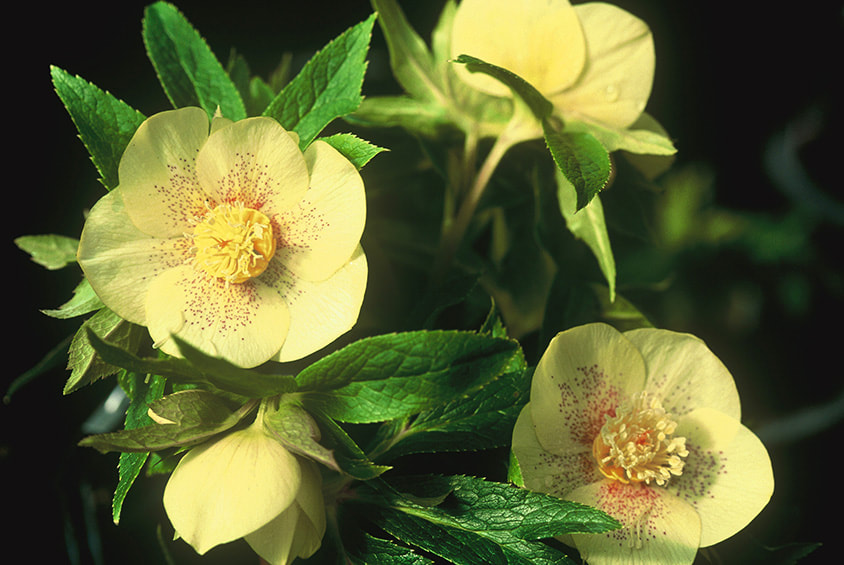 'Golden Sunrise' hellebore (Helleborus x hybridus) is a perennial with single pale-to deep golden-yellow flowers with contrasting red starburst centers. It needs part to full shade, and grows 18 to 22 in tall, 20 to 24 in wide. It is cold hardy in USDA zones 4 to 8. Hellebores appreciate plenty of sunlight during the winter when they are beginning their growing season, so site your plants in dappled shade or beneath trees that drop their leaves in autumn. Also, be careful not to plant hellebores too deeply. This can hinder flower production, so make sure the crown of the plant is just below the soil surface. All parts of the hellebore plant are toxic. That means deer and rabbit typically do not bother them. People who are sensitive to the alkaloids in the leaves should wear garden gloves to avoid developing a mild skin irritation after handling. Find a new hellebore for your garden. American breeders started bringing home garden-worthy hellebores in the 1980s. Today’s spectacular hybrids in shades of purple-black, plum, burgundy, lime-green, shell-pink and white are the result of hybridization of multiple species. Most of the best hybrids available in North America today are seed strains, some developed by making controlled crosses each season, while others come more or less from open-pollinated plants. Check out the gallery below to meet some of the more recent introductions from breeders here in the United States. 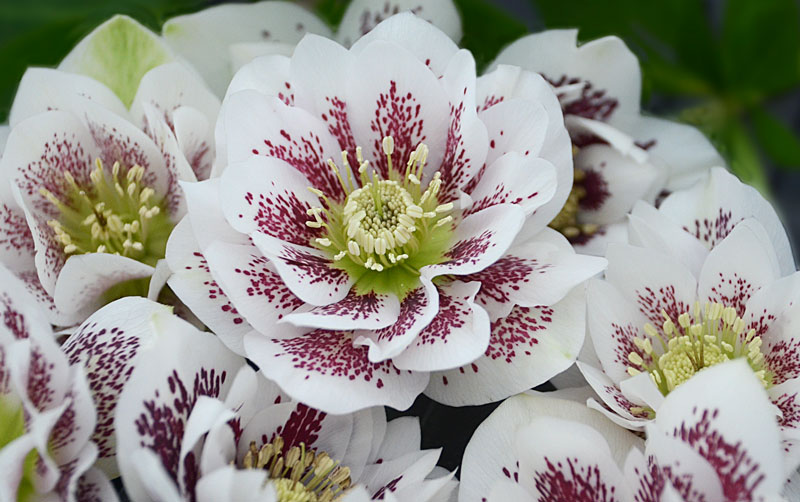 'Confetti Cake' hellebore (Helleborus x hybridus) is a perennial that blooms with double white flowers with burgundy speckling concentrated toward the centers. It needs part to full shade and grows 18 to 24 in tall and wide. It is cold hardy in USDA zones 4 to 9. I hope you will try this beautiful variety of plants in your landscape. They will reward you in early spring with gorgeous blooms that will stay around for several months.
by Judy Kautz, OSU Extension Master GardenerSpring is here and your local garden center has new perennial plants for you! Choosing plants from rows and rows of the same type of perennial can be daunting, especially when you want to pick the very best one to take home. Which plant do you pick when some have buds, some are blooming, and others only have foliage? Here are some selection tips to make your shopping trip easier. First, do you choose plants in full bloom? Not really, since they have already bloomed and the blooms may not last much longer. Pick instead the plant that has buds or the beginnings of flower spikes as your best option. A plant like this is best, because you can see just enough of the flower to be sure you are getting the cultivar and the bloom color you want. Remember that plants do get rearranged by customers, so the sign in front of plants may not necessarily reflect what is there! Tags in pots also get moved around, so seeing the beginnings of the bloom will tell you what you are buying. Next, size definitely does matter. Most often, the largest plant is your best option unless it is leggy. Also, look at the root system to ensure the plant isn’t root bound; a root bound plant (one with a dense mass of roots) can recover, but it will take time. A medium sized plant could root faster with healthier looking foliage after being transplanted, but it might not grow much more this year. Never buy the smallest one if it is the same price as the others, as you will overpay. 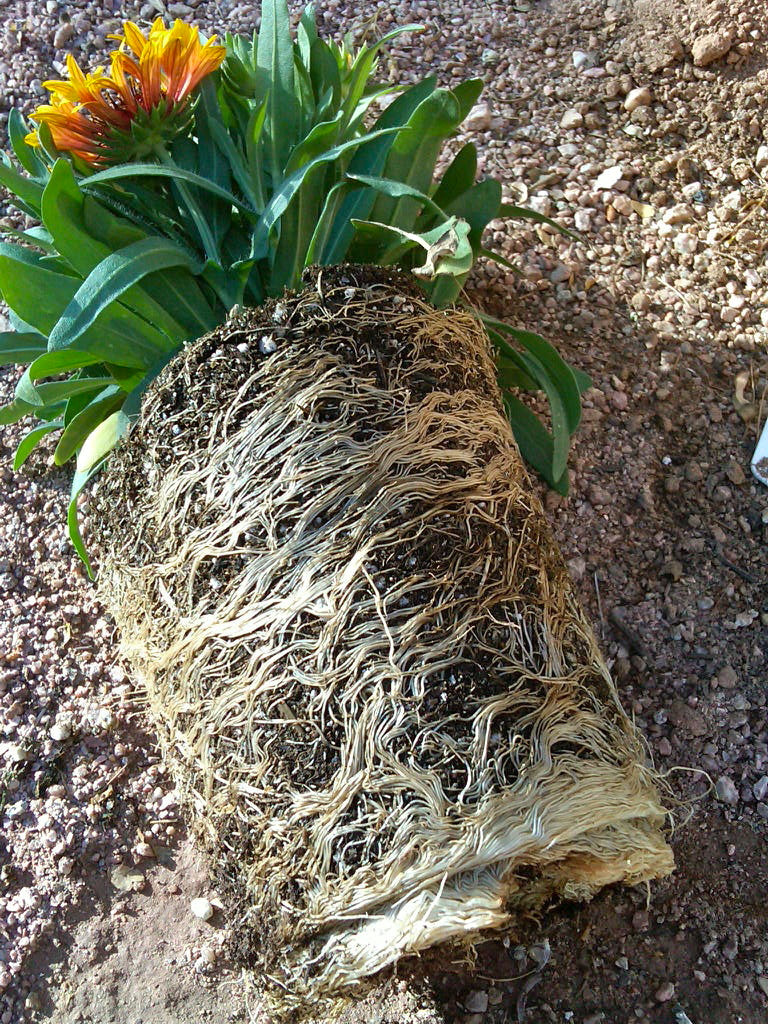 Here's an example of a plant that has been root bound in a pot. Avoid these when purchasing perennials unless you are getting a deep discount. There are some perennials that you should always buy bigger because they are slow-growing; plants like false indigo, Russian sage and peonies fall into this category. Buying the largest plant you can find of these varieties means you will get a bigger impact sooner. With peonies in particular, look into the crown for the plant with most eyes or stems; since peonies are so slow to take off, the more stems, the better. Finally, if you are simply looking for a great deal, choose a plant that is spilling out of its pot, because it can easily be divided into several plants for the price of one. 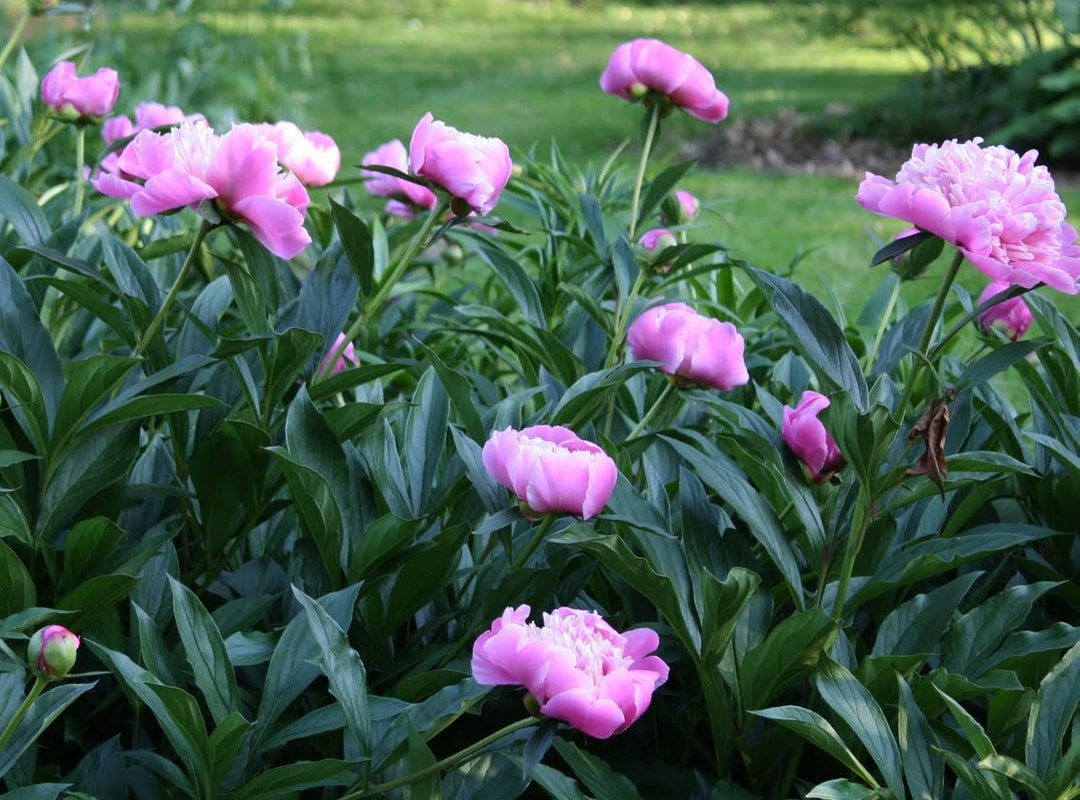 When purchasing perennials like these peonies, buy larger plants with more stems. If you see plants that are deeply discounted because of damage, or you see a plant you think you might be able to revive, those can be difficult to pass up. However, carefully examine the plant first before you decide to spend your money. It will not hurt a plant to look at its roots; simply straddle stems with your fingers and gently tip the top. Here are some things to look for if you are considering buying a damaged or deeply discounted plant. Avoid a plant that has been newly transplanted, with roots that don’t fill the pot. Although it is okay to buy if you get a really good discount, remember that it will be a long time before it takes off in your garden. Second, look for pest damage – lacelike holes in discolored foliage – most likely caused by Japanese beetles. These insects can mark plants for others to find later, so skip insect-damaged plants. If you see shriveled brown or pale leaves, the plant has not gotten enough water or protection from strong sun. If foliage looks really stressed, this plant will rarely bounce back, so leave this one on the shelf. Finally, avoid plants with dead crowns or roots that are easy to pick off; these are signs of overwatering. Since rotted roots never recover, do not buy overwatered plants. 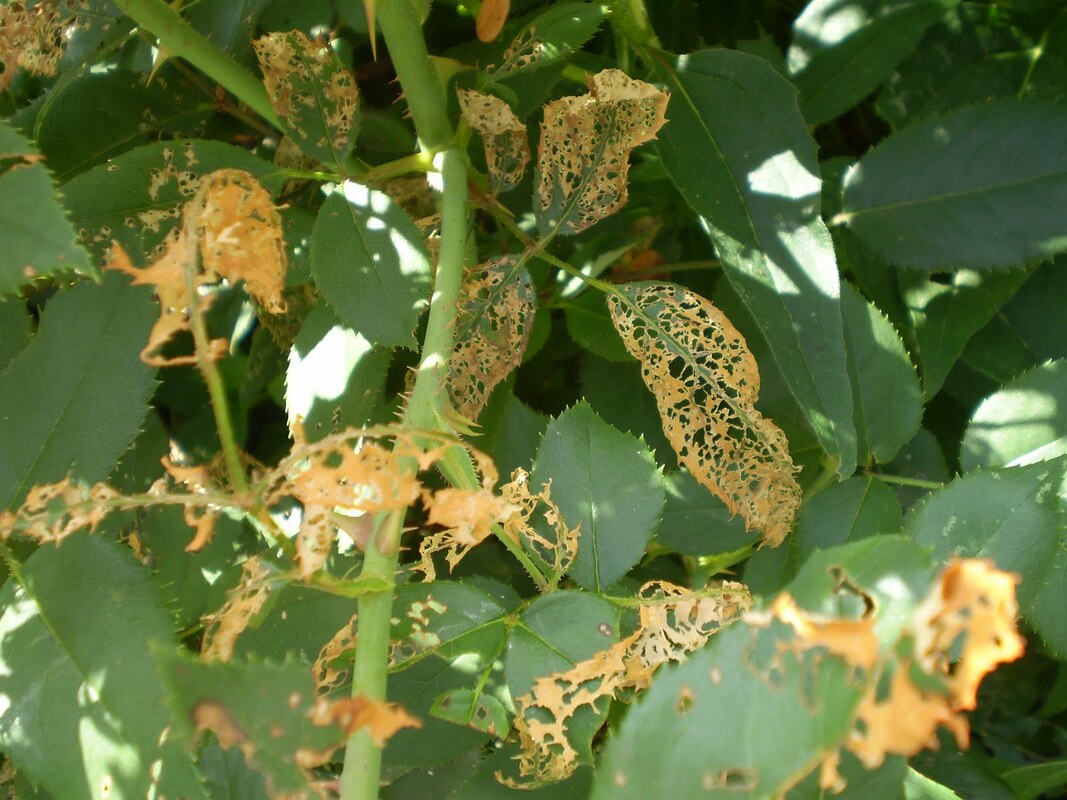 Plants for sale which demonstrate insect damage like this one should not be purchased, even at a discount. If you follow the tips when you choose your perennials, you should bring home plants that will flourish in your garden. And to see many examples of all kinds of plants, visit the Master Gardener Demonstration Gardens at the Cleveland County Fairgrounds, southwest corner adjacent to the gravel parking lot.
by Judy Kautz, OSU Extension Master GardenerDid you know that one half of households in the United States now grow vegetables? Oklahomans are no exception, and each spring we look with anticipation at all the plants and seeds that are available in our local garden centers. There is nothing that tastes better than a fresh vegetable picked from your own garden and eaten on the spot! Successful gardening, whether flowers, vegetables or trees, depends on good preparation, and the first step to growing delicious veggies is to test your soil. A healthy vegetable garden requires well-drained, loamy soil that contains plenty of nutrients. Testing your soil will tell you what nutrients it has. Soil tests can be obtained from your local Cooperative Extension Office, and cost only $10. They will provide you with an analysis of how much nitrogen, phosphorus and potassium your soil contains and whether it is acidic or alkaline, its pH. This is important information to have as you prepare your garden beds. To prepare a soil sample to take to the Cooperative Extension Center, get a clean bucket or pail. Using a spade or shovel, dig from the surface to about six inches and take several samples, about 12 – 16, around the area you want to test. Mix these samples together in your bucket and then put about 3 cups of this soil in a clean container. A clean plastic bag works great. Take your bag of soil to the extension center with your $10. They will send your sample to the Soil Testing Laboratory at OSU, and the results will be mailed to you in approximately two weeks. In those results, they will make recommendations on the amounts of fertilizer to use and any other soil amendments you need to add.  Here are raised bed examples using landscape timbers and edging stones. If you don’t want to test your soil or garden in a bed in your yard, raised beds are a great alternative. In a raised bed, you can control the soil structure, pH and fertilizer nutrient levels. They are great for areas with poorly drained or tight clay soil, because you can add soil purchased or composted and create a great environment in which to grow your veggies. Other benefits are that you can grow vegetables in a smaller space, and it is easier to water and harvest raised beds. There are many materials that can be used for a raised bed; redwood, cedar, vinyl, and composites are all good options. Stone, concrete or landscape blocks also make great borders for raised beds, as do bricks. Landscape timbers and old railroad ties will work; if you use railroad ties, make sure they are not oozing black creosote or smell intensely. A group of half barrels is also great, especially for a patio! You could even use a child’s swimming pool, provided you poke holes in it to allow for drainage. Make sure you have a minimum depth of 8 inches of soil, but 10-12 inches is better. You can fill your bed with packaged garden soil or buy garden-ready soil in bulk from one of your local merchants. Take care when choosing a location for your raised bed; make sure your bed gets at least 6-8 hours of sunshine a day. Locating the bed close to a water source is a must, especially for our hot summers here in Oklahoma. Do not place your bed underneath a tree within its root zone, the spread of the branches. Tree roots will compete with your vegetables or plants for nutrients and moisture. 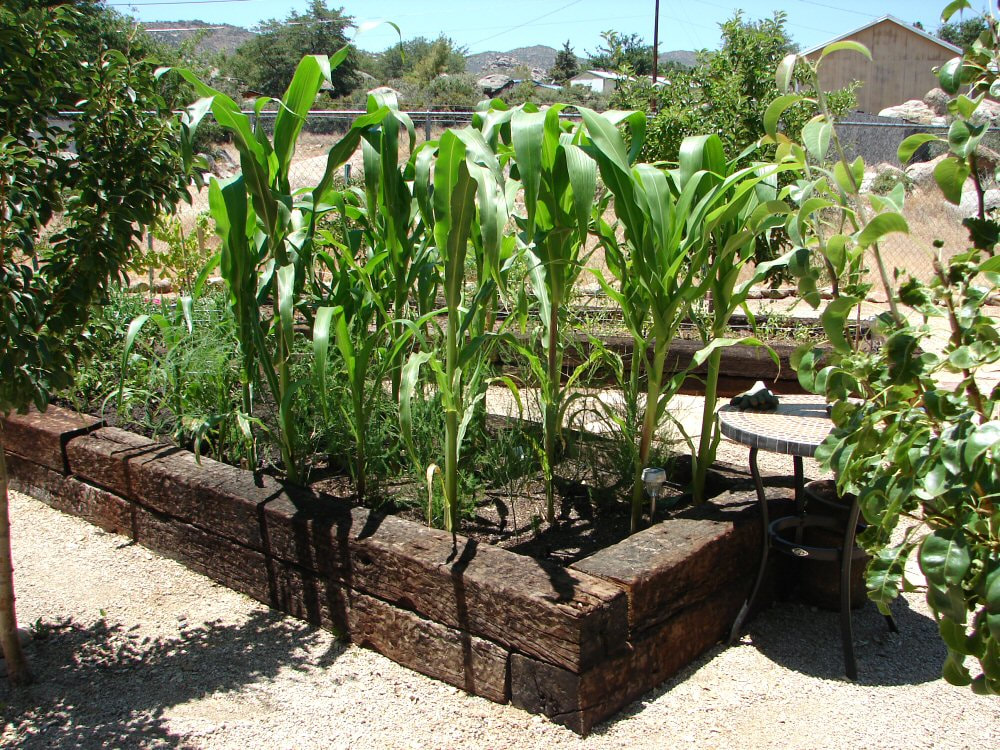 Railroad ties work for raised beds as long as they are not infused with creosote or other materials. Preparation of your beds before the growing season is full upon us will ensure you have the best environment to produce the kinds of crops you want. What varieties you choose make a big difference, since you want to grow plants that are best suited to Oklahoma. In upcoming weeks we’ll discuss varieties of vegetables you can grow in Oklahoma! To see many examples of raised beds for all kinds of plants, visit the Master Gardener Demonstration Gardens at the Cleveland County Fairgrounds, southwest corner adjacent to the gravel parking lot. And for more ideas about gardening and to obtain top quality plants, be sure to attend the Spring Garden Party on April 16 in the demonstration gardens. We will offer how-to classes, activities for kids and the best plants to purchase for your gardens. Also, remember that you can call the County Extension office with questions or submit them online at the Cleveland County Master Gardener website at clevelandcountymastergardeners.org. 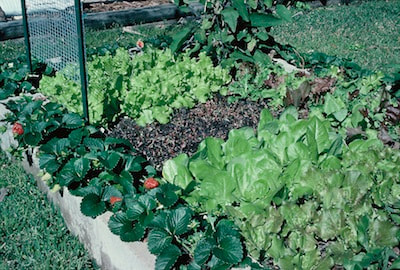 Concrete blocks also make great raised beds!
by Judy Kautz, OSU Extension Master GardenerMother Nature is all over the map with our weather this year! However, there is a solution for any type of weather we encounter – container gardening! Containers are great for flowers or vegetables; they are versatile, colorful, and have great utility, and best of all, they can be moved inside or under cover if we expect bad weather. In short, they are a perfect all-weather solution! Containers are ideal for any environment; they can adorn patios, porches, sidewalks, decks, and balconies. They are portable and can be moved to follow the sun or shade, depending on the plant requirements. Containers can avoid soil, insect and fertilization problems, and they can add a spot of color to any area where you want a lift, or provide delicious herbs or vegetables for your recipes. They are ideal if you love plants and gardening. There are many types of containers available – clay, plastic, metal, ceramic, wood, fiberglass – all are good choices; just adjust watering and fertilizer to suit what type you use. You can use anything you have available…an old wheelbarrow, or even a pair of cowboy boots! Make sure there are drain holes in the bottom, because good drainage is essential. You can put a coffee filter over the drain holes to prevent the soil from spilling. Size is important because you need to make sure there is enough room for the types of plants you use – at least 16 inches in diameter is ideal. Additionally, you should allow at least 6 – 8 inches of depth, again depending on the plant size.  You can use all sorts of items as planters, even a pair of cowboy boots! Soil is important, and any good lightweight soil mix designed for potting is preferable – just look for the words “potting soil” on the label. Do not use soil from the garden or yard, as it is too heavy to work in containers. Fill your container with damp soil mix to within 1 to 2 inches from the top; soil should be moist, but not dripping wet. You can plant seeds or transplants from your local garden center, and most any plant, flower or vegetable, can grow in a container. Be sure to loosen the roots a bit to stimulate them to grow into the soil. Arranging plants in your containers depends on whether you are creating a flower arrangement or growing vegetables. A general rule of thumb for flowers is to use “thrillers, fillers and spillers”. Start with something tall or spiky, like grass or tall flower - this is your thriller - and place it in the center of the container, or towards the back. Next, add mass with a plant that has a round, full shape – this is your filler. Finally, soften the edges with a trailing or cascading plant that will spill over the edge of your container – this is your spiller. Choose a combination of complementing colors or textures, and choose plants that you like! This combination will provide you with an attractive and interesting container. 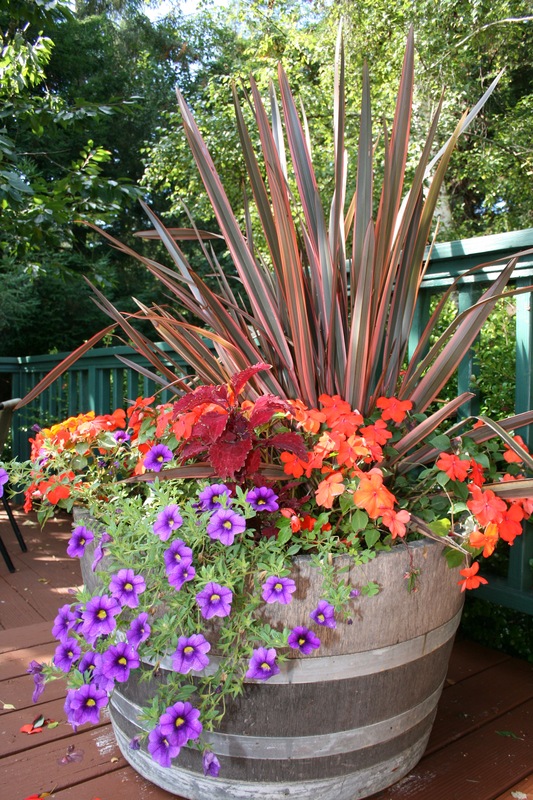 Here is a container with the cordyline as thriller, orange impatiens and coleus as fillers, and super bells as spillers, all which make a lovely decoration on your patio. It is perfectly acceptable to grow your vegetables in pots, too, and sometimes, this is a better solution, especially if you don’t have much room in your yard. A container with vegetables like tomatoes, peppers or squash that is placed in a sunny spot on your patio or deck can produce a wonderful crop of tasty vegetables if you give them water and fertilizer. Make sure you have enough depth and width in your container to handle your chosen vegetables, and be sure to feed often. You will also need to water your containers more often than your garden beds, usually every two or three days, and more often when it is very hot. Fertilize your containers frequently, usually every two or three weeks, as containers need more nutrients since there is limited soil and increased watering. Use either water-soluble or slow release fertilizer – both are good – or combine the two types. Combine several pots in one area for a very attractive display, or group your plants by color or size. If bad weather is expected, you can easily move your containers to a more sheltered area to protect them from the elements. Containers are indeed the perfect all-weather solution! 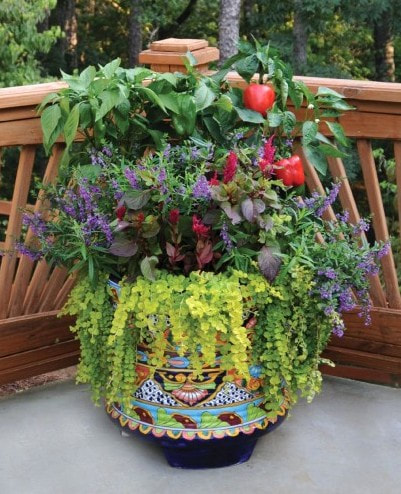 This container is also a mix of veggies and flowers, for an attractive display that is also tasty!
by Judy Kautz, OSU Extension Master GardenerLavender (Lavendula spp.) is a well-known and fragrant perennial plant with gray-green foliage, upright flower spikes, and a compact shrub form. It's native to Europe and can be planted in the spring after the risk of frost has passed and the soil has warmed up. It will grow at a moderate pace, often adding a few inches to its size each year. In the garden, lavender makes an excellent companion plant for almost anything from roses to cabbage. It is one of those aromatic, gray herbs that deer avoid, making it a great choice as a decoy in your beds. Lavender can be toxic to pets like dogs and cats. 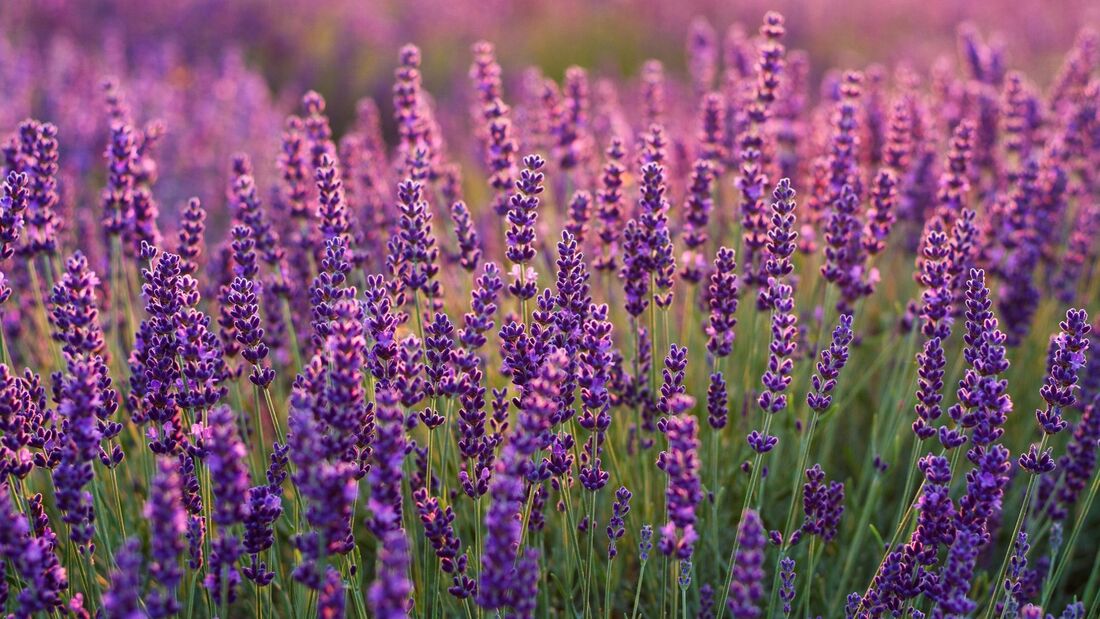 Lavender makes an excellent companion plant for almost anything, and it is one of those aromatic, gray herbs that deer avoid. As with most plants, your success in growing lavender will depend both on what kind of growing conditions you provide and which varieties you select to grow. Lavender plants will tolerate many growing conditions, but they thrive best in warm, well-draining soil and full sun. Most lavenders are labeled hardy in USDA zones 5a through 9a, but this is not a plant that is dependable enough to use as a hedge. Realistically, you can expect plants to do well when the weather cooperates, but be prepared to experience the occasional loss of a plant or two after a severe winter or a wet, humid summer. Even if you do everything right and your lavender plants appear happy, the genus is generally not long-lived and most lavender plants begin to decline in 10 years or less. Keep starting new plants to ensure you have a bountiful harvest for years to come. Lavender plants are fairly trouble-free, but leaf spots and root rot can occur if the soil is too wet. Additionally, many plants will perish if their soil gets too wet over the winter months. Lavender plants thrive in full sunlight, which is the best way to guarantee a lot of buds and big, full bushes. They don't tolerate much (if any) shade, so don't plant them in a spot where they'll be overshadowed by trees or other large plants. Lean soil will encourage a higher concentration of oils (and good smells), so go easy on the organic matter and fertilizer. Lavender plants prefer well-drained soil that is on the drier side, so if you're using a traditional potting mix, be sure to add in some sand for drainage. An alkaline or especially chalky soil will enhance your lavender's fragrance, while any pH below about 6.5 will likely cause lavender plants to be very short-lived. Lavender is a resilient plant that is extremely drought-tolerant once established. When first starting your lavender plants, keep them regularly watered during their first growing season. After that, they can handle extended periods of drought—in fact, too much water can lead to fungal disease and root rot. Lavender can withstand a range of temperatures, and it's usually dampness more than the cold that's responsible for killing lavender plants. Dampness can come in the form of wet roots during the winter months or high humidity in the summer. If humidity is a problem, make sure you have plenty of space between your plants for airflow, and always plant your bushes in a sunny location. Protect lavender plants from harsh winter winds by planting them next to a stone or brick wall to provide additional heat and protection. If you live in an area where the ground routinely freezes and thaws throughout the winter, your lavender plants will benefit from a layer of mulch applied after the ground initially freezes to protect the roots. It's a good idea to add a handful of compost into the hole when you are first starting lavender plants. Beyond that, feeding is not needed with these plants and can detract from the overall potency of your lavender. Although lavender plants get regularly pruned simply by harvesting the flowers, a bit of spring pruning is recommended to keep your plant well-shaped and to encourage new growth. Taller lavender varieties can be cut back by approximately one-third of their height, while lower growing varieties can either be pruned back by a couple of inches or cut down to new growth. If your lavender suffers winter die-back, don't prune your plants until you see new green growth at the base of the plant. If you disturb the plants too soon in the season, they're unlikely to develop new growth. A major reason lavender is so prized is that its flowers keep their fragrance once dried. For best drying results, harvest the flowers as the buds first begin to open. Hang them in small bunches upside-down in a warm spot with good air circulation until dried. Besides being beautiful and aromatic, lavender flowers are also edible. They can be used raw in salads, added to soups and stews, used as a seasoning, baked into cookies, and brewed into tea. Use sparingly; a little lavender flavor goes a long way. 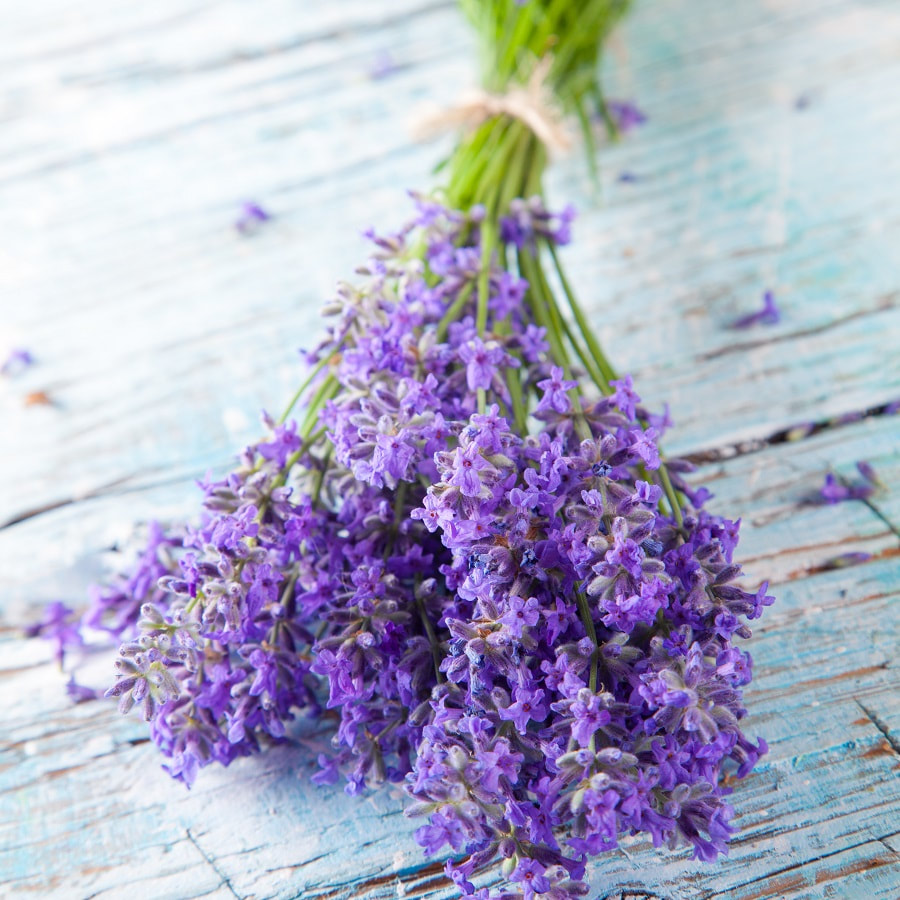 For best drying results, harvest the flowers as the buds first begin to open. Hang them in small bunches upside-down in a warm spot with good air circulation until dried.
by Judy Kautz, OSU Extension Master GardenerWouldn’t it be great to have earlier harvests for our favorite summer vegetables? Recent research has proven that our winters may be getting warmer by a degree or two, but that isn’t going to help much with creating earlier harvests. However, there are a number of techniques you can employ to enjoy home-grown vegetables earlier this summer. First, select early-maturing varieties for your vegetables; seed companies advertise many options for shorter maturity times for almost every type of vegetable. Look for those that mature at least 10 days earlier than the normal varieties. ‘Sweet Zuke’ or ‘Sure Thing’ are zucchini varieties that mature early, for example; earlier yellow squash varieties like ‘Early Summer Crookneck’ and ‘Early Prolific Straightneck’ not only produce harvests earlier, but also have many other good traits. Most seed companies and nurseries offer similar choices for most vegetables. 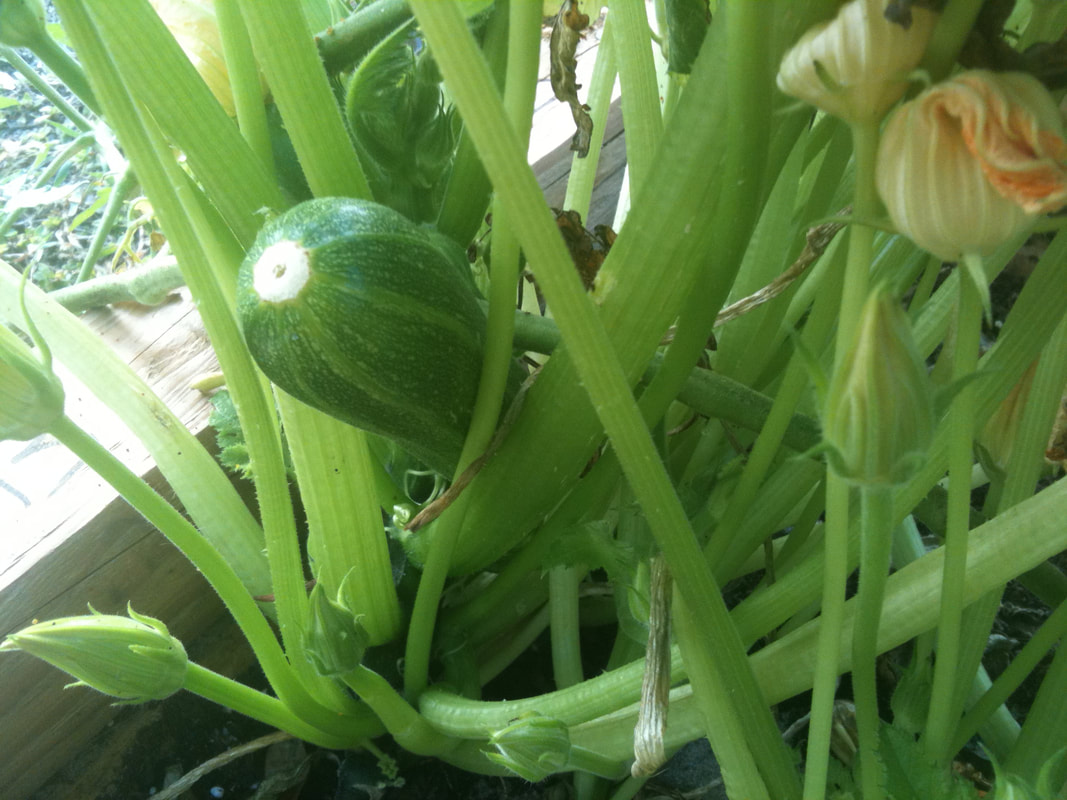 'Sweet Zuke' is a variety of zucchini that will produce an earlier harvest. 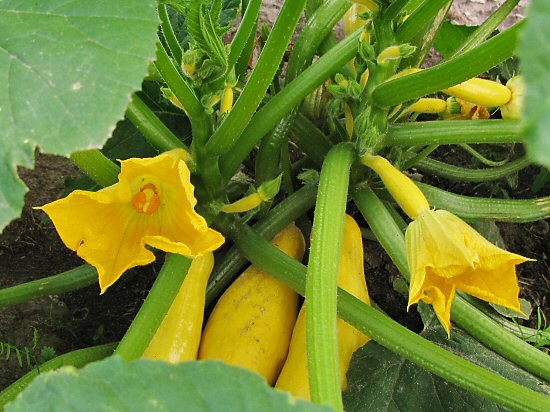 'Early Summer Crookneck' provides wonderful yellow squash. Another technique to use for early harvest is to plant as early as possible; watch forecasts and check the Mesonet (www.mesonet.org) for soil temperatures in Oklahoma. Watch the weekly forecast, and if you have already planted and cold temperatures are predicted, cover your tender seedlings with plastic or milk jugs, for example, to protect them. You can also warm the soil in your beds using black plastic mulch; although this is not a preferred mulch variety because it is not natural, it is still very effective for warming the soil. About two weeks before planting, spread the mulch over your bed, making sure the black surface is as exposed to the sun as much as possible. When you are ready to plant, simply cut a circle in the plastic and insert your seedlings. Another option for earlier harvests is to start your plants indoors. Although some varieties are not recommended for transplanting, it is still possible for some varieties; for instance, using peat pots or pots of material that will be absorbed into the soil will offer little disturbance to them when you set them outside. It also helps to give your seedlings as much sunlight as possible, or to use a shop light or florescent desk light over them to aid their growth. Be sure to provide seedlings with a good plant food so they will keep growing until it is time to set them out in the garden. Here’s a fun idea for starting seeds early, and it would be a fun project for your children or grandchildren, to get them involved in gardening. Purchase some ice cream cones, the regular cup variety, and not sugar cones. Place seed starting mix or potting soil in each cone and plant your seeds just as you would do in a peat pot. Once your seedlings are ready to transplant, just put the entire cone in the ground. It will disintegrate and you will be left with a healthy plant to nourish in your garden. What fun! 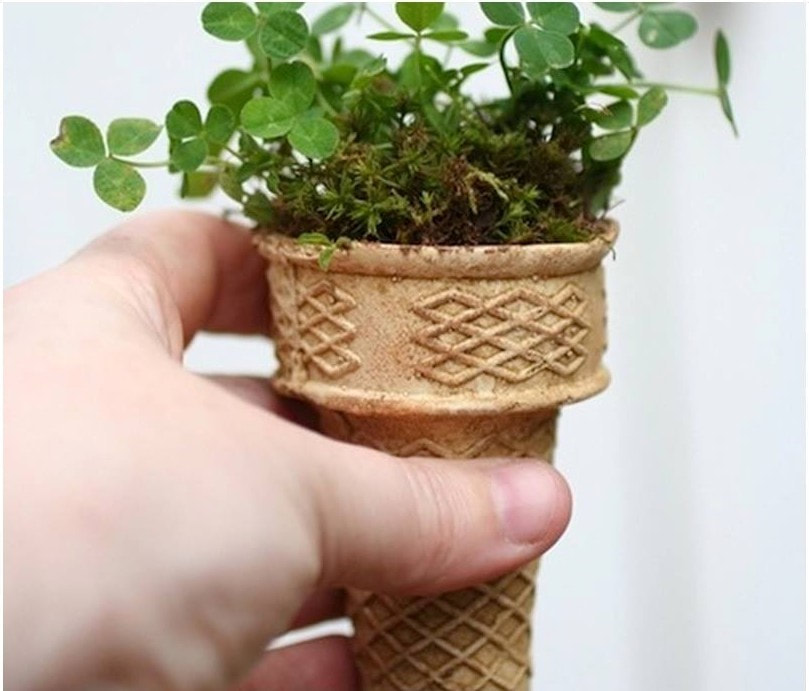 Start your seeds in ice cream cones for a biodegradable way to plant without disturbing tender transplants. When you are ready to transplant your seedlings outdoors, it is important to allow them to become accustomed to the change in environment. Gradually expose them to the outside over a period of three days or so, increasing their exposure each day. Also, be careful not to damage the young, tender seedlings when you handle them. Place them at the same level they were growing in your pots; water and feed them again as well. Avoid planting your tender seedlings on windy days...late afternoon is a good time to plant.
If you follow the steps listed above, you can have earlier harvests, and don’t we all look forward to those wonderful, tasty veggies right from the garden! |
Welcome to Dishing the Garden Dirt!
|
 RSS Feed