by Judy Kautz, OSU Extension Master GardenerHave you see holiday cactus for sale in stores this season? This is the time of year when they become readily available. One of the most popular houseplants, Christmas cactus is a great way to add a burst of color indoors during dreary winter months. If poinsettias and amaryllis are not your cup of tea for holiday blooms, why not try a holiday cactus? These plants are known for their colorful tubular flowers and ease of care, and they are readily available in our area. They make wonderful houseplants or summer garden plants, and they are a perfect holiday gift for that hard-to-buy-for person. There are actually three types of holiday cacti (see photo): the Christmas cactus has flattened leaves with rounded teeth on the margins; the Thanksgiving cactus has pointed teeth, and Easter cactus has pointed teeth with fibrous hairs in the leaf joints. Interestingly, under normal conditions holiday cactus will bloom close to the holiday of its name, but these plants can be forced to bloom at other times. And to make things a little more confusing, most of the Christmas cactus sold are actually Thanksgiving cactus, and they will bloom in subsequent years at Thanksgiving time! 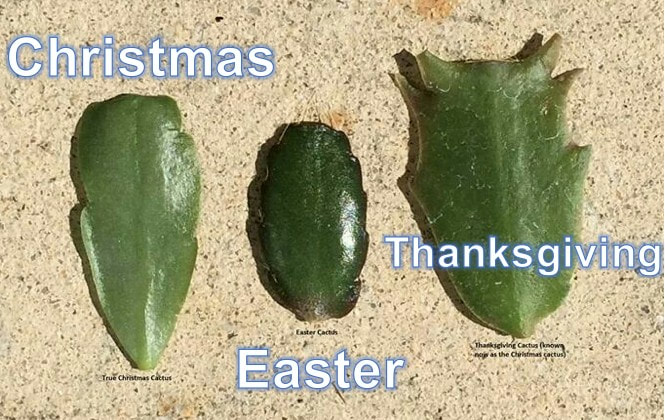 This photo helps you easily identify the three different types of cactus that are available. Holiday cacti are really very easy to care for and will flourish in most homes. When the plants are in flower, they should be kept in bright, indirect light, because too much light will cause the flower to fade, or the heat may cause the flower buds to drop. Ideal temperatures are 70 degrees during the day and 60-65 degrees at night. Be sure to water your cactus thoroughly, and let the plant dry only slightly between watering. Even though they are called cactus, they are not as drought-tolerant as their cactus name suggests. The leaves will wrinkle if the soil is dry, and during flowering, letting them dry too much will cause the flower buds to drop. Once the flowers fade, you may continue to grow your cactus as a house plant. Soil should be well drained, and a fertilizer should be applied monthly between April and October using a complete houseplant fertilizer. To encourage branching and more flowers, prune your plant in June; just remove a few sections of each stem with your fingers or a sharp knife. An added benefit is that the removed pieces can easily be rooted in moist vermiculite to make more plants! 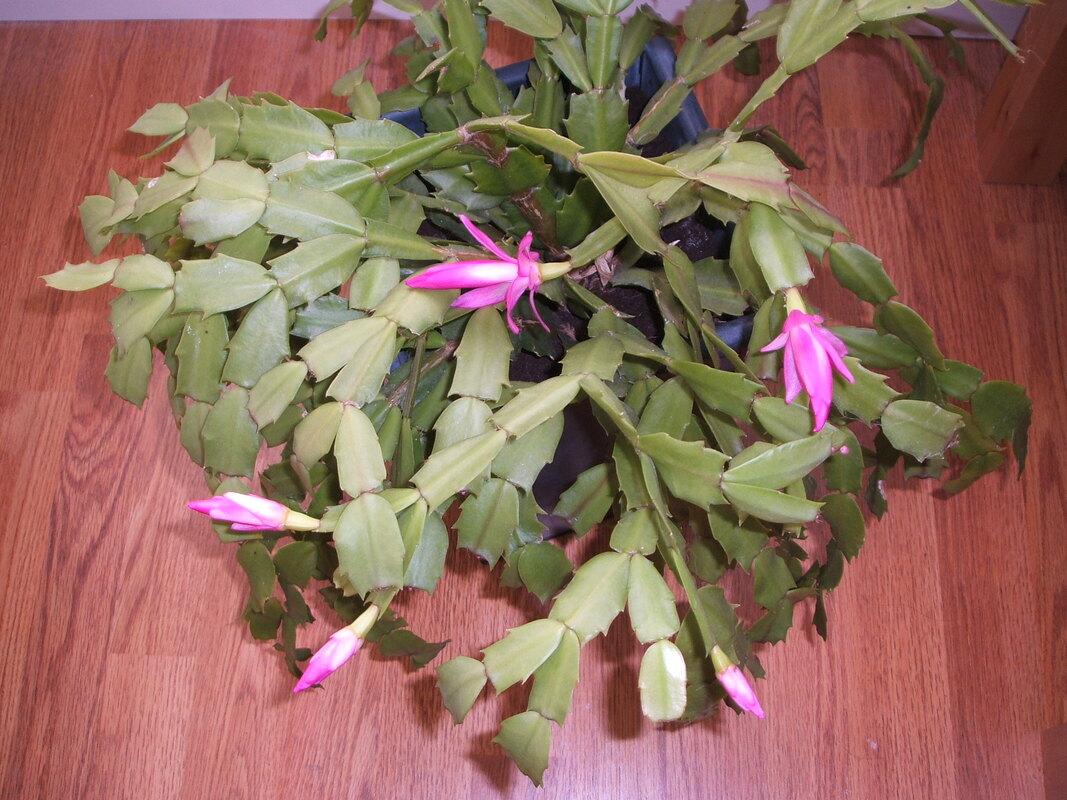 This is a Thanksgiving cactus with points on its leaves, and pink is a very common color for this variety. Holiday cacti flourish if placed in a shady spot in your garden during the summer, until the temperatures get below 45 degrees. The naturally longer nights and cool temperatures in late summer also encourage flower development. Getting them to flower, though, requires some understanding of the plant itself. Holiday cacti are short day plants, which means they bloom when nights are at least 15 hours long. They will also flower if they are exposed to prolonged cool temperatures between 50-55 degrees. No flowers will form in night temperatures above 70 degrees. Holiday cacti grow and flower best when the roots are a little cramped, so they do not need to be repotted annually. Repotting is only necessary when the soil becomes compacted or the plants have completely outgrown their containers. The best time to repot holiday cacti is spring or early summer (when the plants are no longer blooming). Here is information about regular maintenance for your cactus. A Christmas cactus loves being pot-bound, and you only need to repot it every two years, at most. However, you may have to replace the soil more often that you need to change pots. The only other regular maintenance you need to do is pruning. The plant can get rather leggy, and its branches will start to drop because it couldn’t support its weight. As such, you can prune away or cut off a piece to propagate. Moreover, after blooming, simply pinch off the ends of the plant’s stems to encourage branching. Holiday cacti are available locally in most garden centers; they are a great alternative to bring color into your home during the drab days of winter!  The beautiful red color of this holiday cactus is perfect for Christmas.
0 Comments
by Judy Kautz, OSU Extension Master GardenerWe’ve had our first freeze and now we have a decision to make. As gardeners, we like to keep our yards cleaned up and cleared of debris, especially after our first frost and, especially after plants have turned brown and shriveled. But, is it better to wait until spring to clean up the yard or do it now? There are a number of good reasons to let the debris remain until spring. First, if you have perennials that are evergreen, do not cut them; leaving them adds extra nutrition they get through their leaves. Also, plants like sedum, even though their blooms are spent, offer winter interest to your garden, especially if we have a dusting of snow. Winter grasses can look lovely after a heavy morning frost. 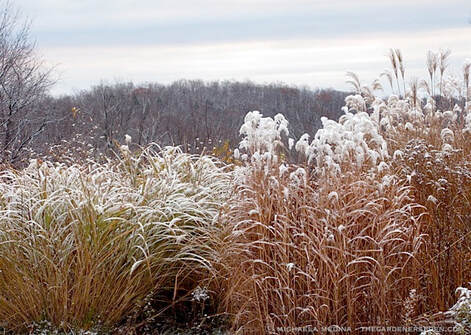 Ornamental grasses are best left through the winter as they provide interest in the garden. Foliage left on your plants also provides natural protection from the winter cold; stems and crowns of plants can catch blowing leaves, which can add more insulation. Additionally, plants with hollow stems like salvia, are unusual; if the stems are cut, winter moisture can make its way to the crown, damaging the plant or even killing it. If you want to save time and energy, wait until spring to remove withered leaves on plants like daylilies. It is much easier to apply a gentle tug to remove leaves instead of using pruners! However, iris plants do benefit from giving their leaves a trim in the fall; simply cut the leaves in a fan shape, leaving about 4-6 inches on the leaves. If you are a bird or wildlife lover, then leaving spent plants through the winter provides great benefit to these creatures. Birds love the seeds from Black-eyed Susans, coneflowers and ornamental grasses. The finches, particularly, have enjoyed the buffet in my yard provided by the standing phlox seed heads this year. Grasses and plant debris also offer shelter to birds and small critters as the weather turns colder. 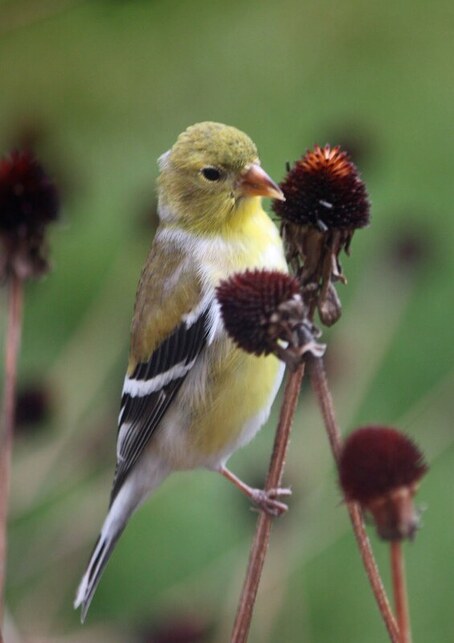 Finches love to feast on the seedheads of the black-eyed Susan in winter. Now that we’ve talked about why you should wait until spring to tend your spent perennials, there are still some very good reasons to do some fall clean-up. Disease prevention is the best reason; be sure to discard rather than compost any plant material suspected of being infested by disease or insect pests. Plants like bearded iris can harbor iris borers and fungal disease if they are not pruned up before winter. If you want to remove leaves, make quick work of a yard full of leaves with a sturdy piece of cardboard. Using it like a snow shovel, push a wide swath of new fallen leaves into piles. Do a fast pass across the lawn every day or two before leaves pack down or get rained on to keep them all together until you have a chance to move them to the compost pile. 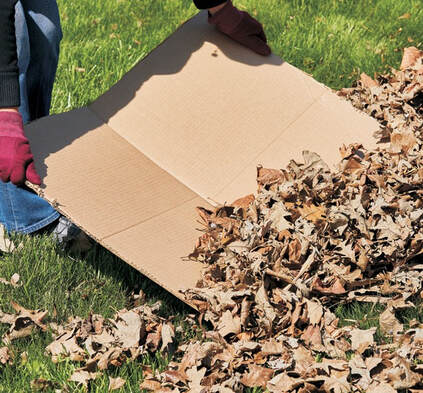 Cardboard used like a shovel works great to gather up leaves in your yard until you can get them to compost pile. If you don’t want plants that self-sow like coneflower, blanket flower, black-eyed Susan, or globe thistle to reseed, be sure to cut them back in the fall before their seed heads mature. Keep in mind, however, that these very same plants have seeds that attract birds to your yard. If you enjoy bird watching in your yard in the winter, save this task until spring!
Unattractive foliage is probably one of the most compelling reasons to clean up your plant debris in the fall. Who wants to look at black or slimy leaves after a frost? There are some plants that are particularly bad for this: ligularia and Japanese anemones are some of the worst offenders, so prune up or remove this type of foliage. For a gardener, there is always something that can be done in your yard; all our landscapes need some work in the fall and in the spring, because a gardener’s work is never done! by Judy Kautz, OSU Extension Master GardenerOur first hard freeze is imminent, and now is the time to harvest your remaining produce before our lows dip down to really freezing temperatures. Even though we have had a light frost, you can still harvest your veggies to enjoy later this winter. Here’s how to store these vegetables so you can enjoy them into the winter. Fall-planted carrots are some of the easiest vegetables to store; wash roots, trim the tops to ½ inch and place in perforated bags. These veggies can be stored in a refrigerator, cold garage or pit for 2-4 months. A box works well for storage; simply layer carrots in sand or soil and place in a cool garage. You may also overwinter your carrots in the ground if you cover them with a heavy layer of mulch. Winter or black radishes may be stored the same way as carrots. Other radishes should be washed and trimmed, top and bottom, and stored in plastic bags in the refrigerator; they will keep up to one month. 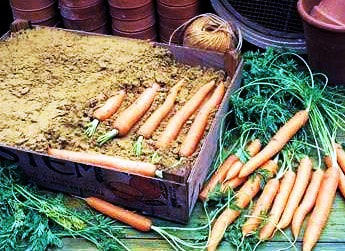 Carrots can be stored in a box with soil or sand so they can be used well after harvest. Winter squash and pumpkins should be stored with part of the stem attached. These vegetables can be placed on shelves in a single layer so air can circulate around them; they will keep for several weeks. Of course, pumpkins are among our favorite decorations for Halloween and Thanksgiving, and they make great pies and soup as well. 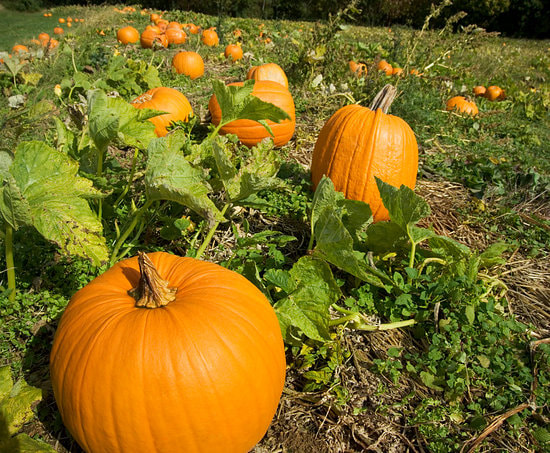 Pumpkins should be stored with part of the stem still attached and will keep for several weeks. Onions are another vegetable that keeps well long after harvest; you should remove tops and then place onions in shallow boxes or mesh bags. They really should be cured in a garage or barn for 3 to 4 weeks before using. Onions will keep for several months if they remain dry. This was a banner year for green peppers! The recent rain we had in the fall coupled with our cold snap in mid October resulted in a bumper crop of green and jalapeno peppers. Your peppers can be stored in plastic bags at 40 degrees for at least 2-3 weeks. Peppers also freeze well; you can dice or slice them, blanch them in boiling water for four minutes, and freeze them in plastic bags. These frozen peppers work great in sauces, spaghetti, fajitas, etc. – anywhere you use cooked peppers. If you want to use them in salads, do not blanch; just dice them and place in plastic bags right in the freezer. If you have green peppers that are medium to large sizes, stuffed peppers are a perfect way to prepare a delicious meal for your family and use those extra peppers. Here is my husband Ron’s favorite stuffed pepper recipe: brown 1 ½ pounds of ground beef with 1 cup chopped onion. Add 1 can whole kernel corn, ½ cup instant brown rice, 1 tablespoon Worcestershire sauce, 1 can garlic and onion flavored diced tomatoes and ½ teaspoon salt. Stir and simmer for 15 minutes. In the meantime, cut the tops off 6 – 8 green peppers and remove seeds and excess membrane. Sprinkle inside of peppers with garlic salt and place upright in baking pan. Stir 1 cup shredded cheese into meat mixture and spoon into peppers. Bake at 350 degrees for 1 hour. Serve with Texas toast or garlic bread for a yummy and satisfying meal. If you have many, many peppers, you can also freeze your stuffed peppers; when ready to serve, thaw, cut each pepper in half and cook in microwave for 3 minutes. They may be a bit juicy, but extra juice can easily be absorbed by a paper towel. They are a great quick meal for busy evenings. With proper storage, you can enjoy your vegetable harvest for many weeks to come! 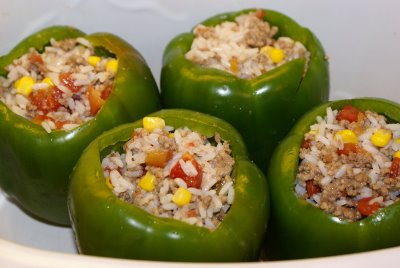 Stuffed peppers are a great way to use green peppers harvested before our recent frost.
by Judy Kautz, OSU Extension Master GardenerMany of us have lost many trees in our landscape during our recent drought and hot weather, but there can be a silver lining. If you have the need to replace trees, consider adding trees that have beautiful foliage in the fall. Although we do not enjoy as brilliant the foliage of hardwood trees as they do in the Northeast, there are still many trees that we can grow here that will beautify our yards with autumn colors. Local nurseries and garden centers have been having sales, with many trees featured at reduced prices. This is the perfect time to consider planting new trees in your yard to bring you lovely fall foliage next year. Let’s look at some perfect varieties for Oklahoma. A favorite tree which sports orange-red fall color is the Chinese Pistache; at maturity, it can get as large as 25-35 feet, and its foliage is relatively pest free. The female tree has attractive red or blue fruit, and this tree has a medium growth rate. It becomes more rounded as it grows, and is hardy throughout Oklahoma (zones 6-9.) It is readily available in our area. 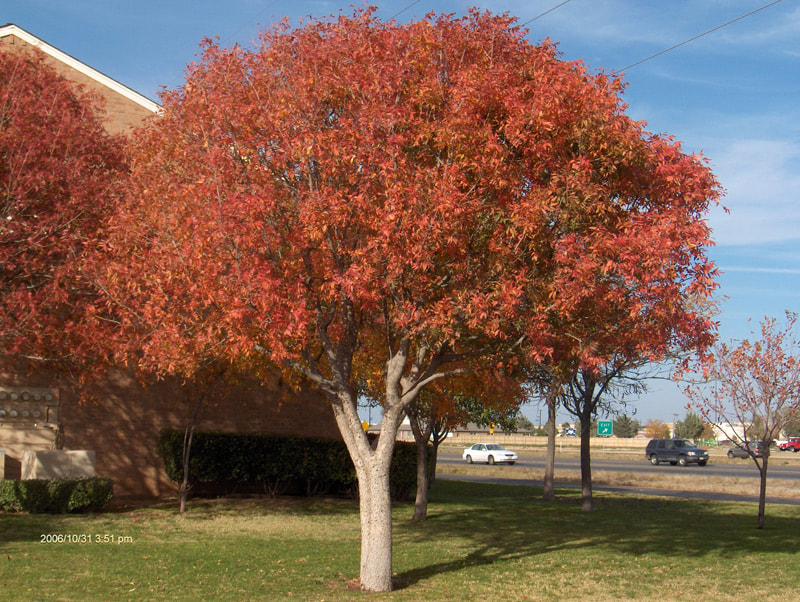 Chinese Pistache tree is well-suited to Oklahoma with beautiful red foliage. If you like yellow fall color, consider the Lacebark Elm; it grows 40-60 feet at maturity, and has glossy leaves and attractive red fruit. Another unique feature of the Lacebark Elm is its exceptional brownish-orange mottled bark, which adds viewing interest. If it is irrigated and fertilized, this tree will grow very fast, becoming rounded at maturity, and is also hardy throughout Oklahoma. Additionally, it is an excellent disease-free substitute for the American elm. 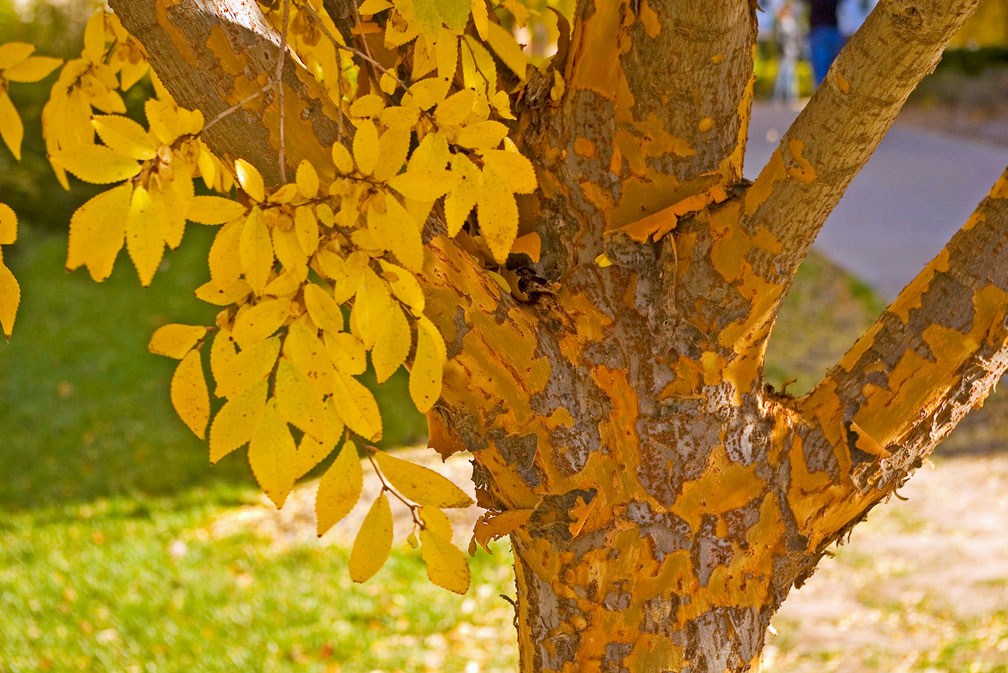 Lacebark Elm has not only lovely yellow foliage, but very interesting bark as well. Another tree which grows well here in Oklahoma is the Bald Cypress; growing from 50-80 feet at maturity, its fern-like foliage will turn reddish-brown in the fall. An added benefit of this tree is that it is drought tolerant, with a medium to fast growth rate. It is pyramidal in shape at maturity and has attractive, rounded fruit. This tree is hardy throughout Oklahoma and readily available locally. Maples are known for their beautiful fall color, and there are many varieties that do well here in Oklahoma. These trees are generally smaller in size, about 15-20 feet, so may be better if you have a small area. They have shiny, three-lobed leaves and some varieties have attractive red fruit as well. They are quite adaptable to many conditions, pest free and hardy throughout Oklahoma. Ask your local nursery or garden center for varieties that have red fall color. 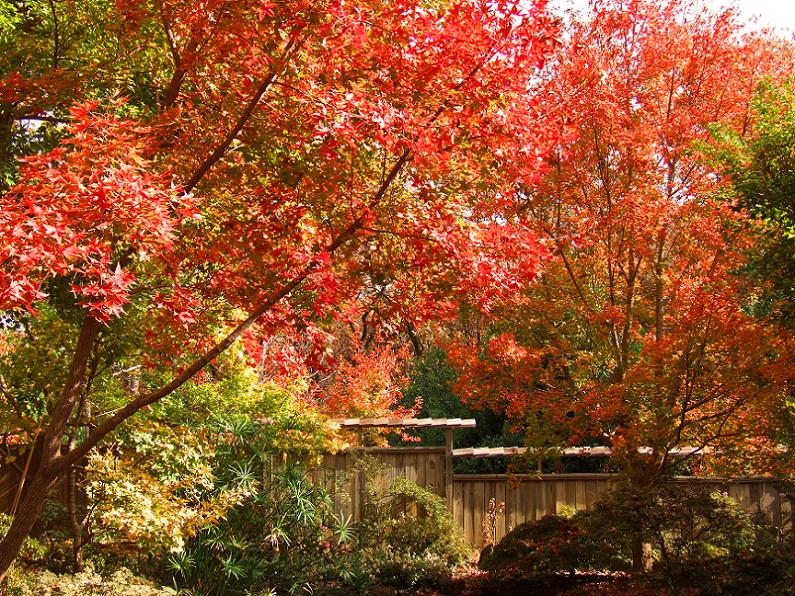 Shantung Maple is one of the many varieties of maples which provide brilliant foliage in fall. Once you have decided which trees you want, how do you plant them? First, dig a hole 2-3 times the diameter of the tree’s root ball; don’t dig too deep, as the tree should be planted at the same or slightly above the original grade of the ball. Be sure to cut any rope tied around the tree, designed to keep the burlap covering the root ball, as it will cut into the tree as it grows; it is okay, however, to leave the burlap in place on the root ball. Place the tree in the hole and fill with native soil; tamp lightly and do not over-fertilize newly planted trees. It is a good idea to stake a young tree if it is top-heavy or in a windy area, but remove the stakes after the first season.
Keep a 5-6 foot circle weed- and grass-free around the tree, and place 1-3 inches of organic mulch in this circle. Water at least 1 inch weekly, and continue to water throughout the winter. It is also a good idea to wrap the tree as winter approaches to protect the young, tender bark from rodent damage and temperature fluctuations. Your tree may also benefit from wrapping for the first couple of summers to protect it from sunscald. Planting new trees this year will give you fall color next year! Now is the perfect time to add beauty to your yard! by Judy Kautz, OSU Extension Master GardenerFall has finally arrived, and with it cooler weather! Fall is also the time for pumpkins – to grow, to eat and to use in decorating our homes and landscapes. Pumpkins are really versatile and they have a very interesting history. 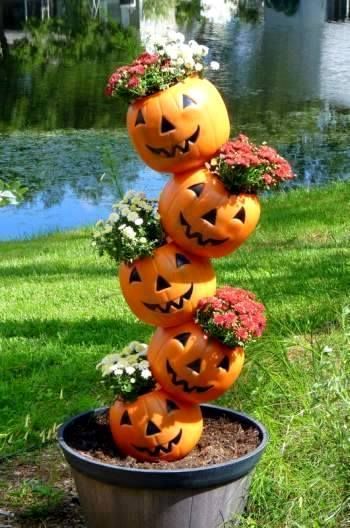 For a whimsical look to your landscape, thread several pumpkins at opposite angles onto a small pipe to create a totem. Fill the pumpkins with flowers and top with a scarecrow hat for an eye-catching yard design. Pumpkins and squash are believed to have originated in the ancient Americas. These early pumpkins were not the traditional round orange upright Jack-O-Lantern fruit we think of today when we say the word pumpkin. They were a crooked neck variety which stored well. Early Native Americans roasted pumpkin strips over campfires and used them as a food source, long before the arrival of European explorers. Pumpkins helped them to make it through long cold winters. They used the sweet flesh in numerous ways: roasted, baked, parched, boiled and dried, and they ate pumpkin seeds and used them as a medicine. The blossoms were added to stews and dried pumpkin could be stored and ground into flour. Also, they dried the shells and used them as bowls and containers to store grain, beans and seeds. And they pounded and dried the pumpkin flesh into strips and wove the strips into mats which they used for trading purposes. Native Americans introduced pumpkins and squashes to the Pilgrims. Pumpkins were an important food source for the pilgrims, as they stored well, which meant they would have a nutritious food source during the winter months. Did you know that pumpkins were served at the second Thanksgiving celebration? The Pilgrims cut the top off of a pumpkin, scooped the seeds out, and filled the cavity with cream, honey, eggs and spices. They placed the top back on and carefully buried it in the hot ashes of a cooking fire. When it finished cooking, they scooped the contents out along with the cooked flesh of the shell like a custard. Does this sound like an early pumpkin pie? Yes, without pumpkins many of the early settlers might have died from starvation. Today, pumpkins are symbols of harvest celebrations. 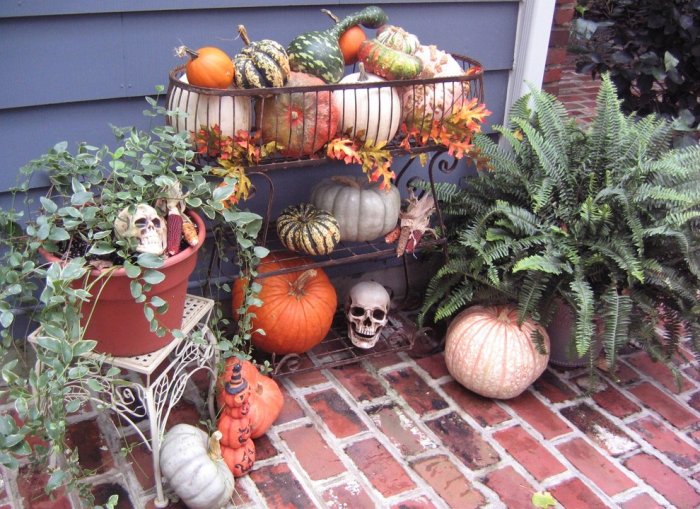 Use skulls with pumpkins to add Halloween flavor to your fall feature. Pumpkins are very good for you, and they taste good! Nearly every part of the pumpkin can be eaten. The cooked pulp is fabulous in pies, cookies, breads, soups, appetizers, main dishes . . . the list goes on and on! The blossoms are excellent breaded and fried or use as a wrap. The seeds make a great snack. Of course, pumpkins are wonderful as decorations! A squatty pumpkin makes a surprisingly sophisticated vase. With the top and contents removed, the pumpkin holds water for up to seven days. Or put flower foam, dirt and even a plastic container inside to hold and nourish flowers. Roses, lilies, and poms crowded into the pumpkin’s opening can be stunning! 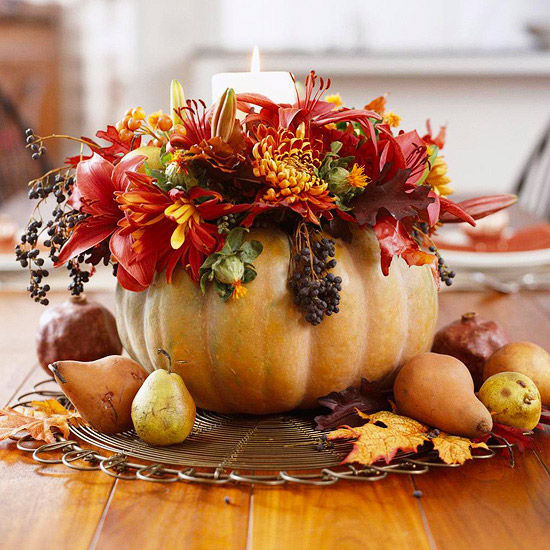 White or pale orange pumpkins filled with mums, berries, and nuts surrounded by pears and other fall fruits are stunning on a table. Mix things up and use a white pumpkin this year, sometimes called a fairytale pumpkin. Flowers in yellows, peaches and shades of orange, accented with sprigs of berries complement the white pumpkin shell beautifully. To help extend freshness, coat the cut edges in Vaseline. Or purchase a white foam pumpkin at a craft store and fill it with natural flowers. Small grapefruit sized pumpkins and even the tiny gourds can hold dry grasses, votive candles and taller candles. Use them to hold flowers in your centerpiece and place a big pumpkin between them. Or try mixing a bud vase with a candle and a small pumpkin on a pedestal. Combinations like these reflect the rich variety of textures available in autumn. 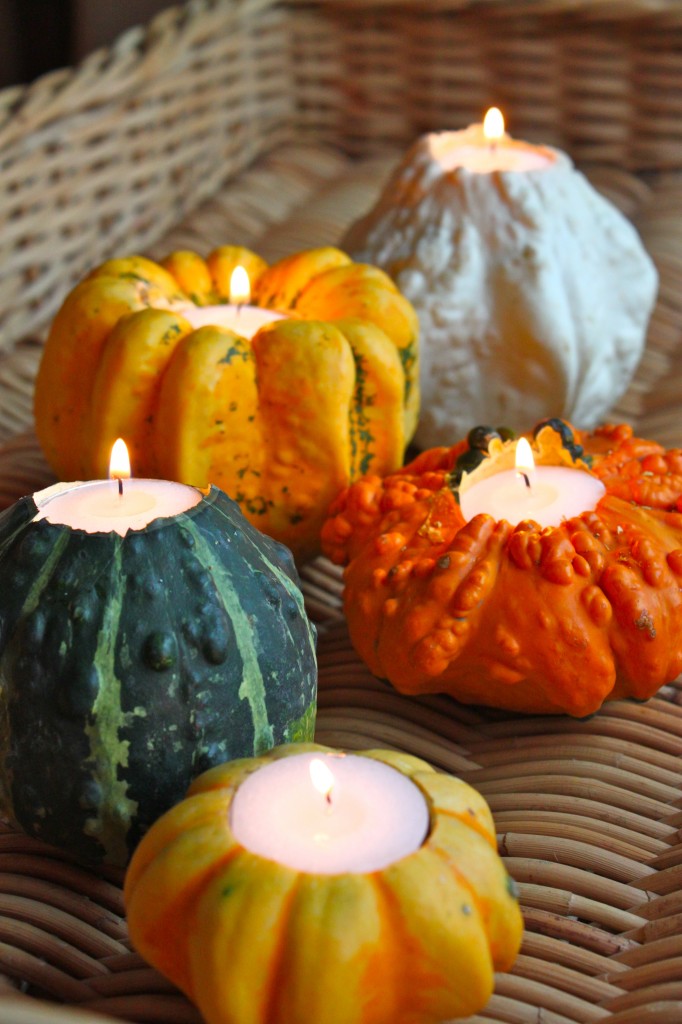 Small pumpkins and gourds are perfect in centerpieces using votive candles in them. Pumpkins are one of the most versatile vegetables we have, for growing, eating and decorating. Pause a moment to appreciate the beauty of the common pumpkin. Its buttery smooth surface and even lines could round out a Halloween or fall theme in your home. For very little expense, you’re buying an unusual, seasonally appropriate decoration. And you won’t even have to find a place to store it afterwards!
by Courtney DeKalb-Myers, OSU Extension Horticulture EducatorHerbs are an excellent addition to any garden. They’re easy to grow with few pest problems. Seasoned gardeners are accustomed to adding fresh herbs to their meals to create robust, unique flavors. As the growing season comes to an end, preserving herbs can be a way to bring that flavor into the winter season. 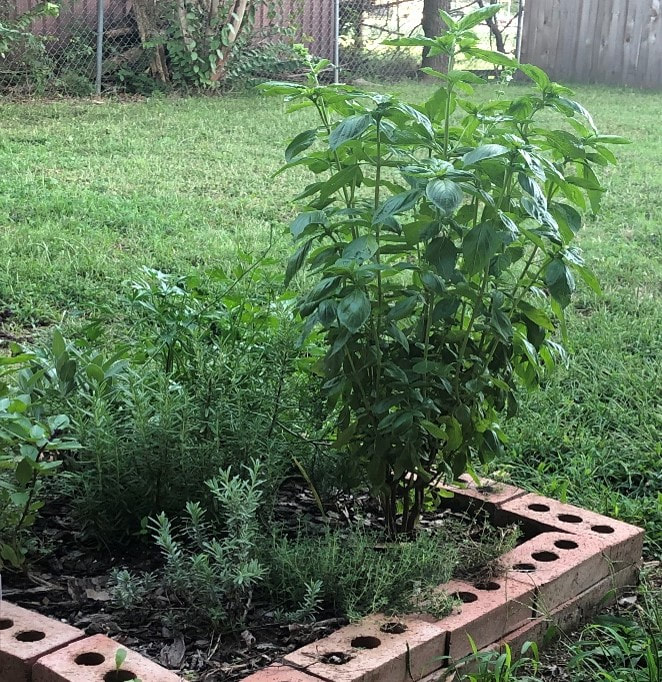 Before herbs can be preserved, they need to be harvested in a way that maximizes flavor. Harvest in the morning while the temperatures are still cool. There are more flavor-inducing oils at this time. It’s also best to make sure that the herbs are not flowering. Pinching off flower buds encourages the plant to put more energy into it’s foliage. Use sharp scissors or clippers to harvest herbs. This creates a clean wound that is easy for the plant to heal. After harvesting, gently rinse herbs with cool water and pat dry. When herbs have completely dried, they are ready for preservation. 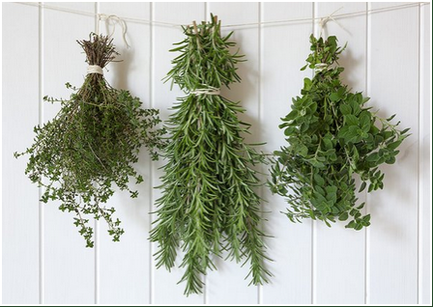 Photo from University of Illinois Extension DryingTo dry herbs, tie them in bunches and hang upside down. This needs to be done in a dry, well-ventilated area. Herbs will be crackly crisp to the touch when they are completely dry. This will take about two weeks for most herbs. If there are concerns about dust or insects, a paper bag can be placed over hanging herbs. This will add additional drying time though. Dried herbs should stored in tightly close jars. 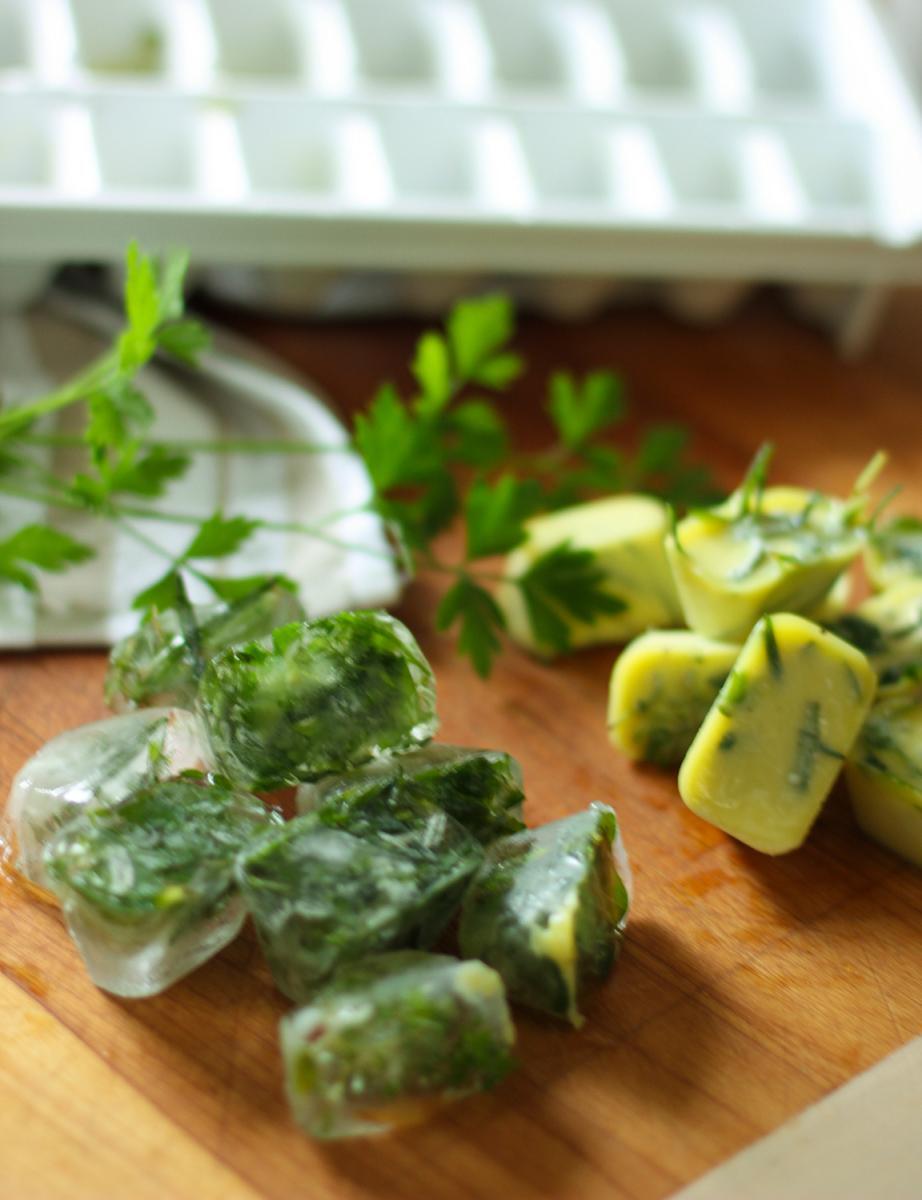 Photo from The Ohio State University FreezingSome herbs lose their flavor when dried, so freezing is the preferred preservation technique. This is true for cilantro, chives, and mint. Chop herbs and pack them into ice cube trays. Pour water or oil over the packed herbs and place in freezer. After the liquid freezes, pop ice cubes out and place in freezer bags for storage. This can be an easy way to add flavor to sauces, soups, or glasses of iced tea. 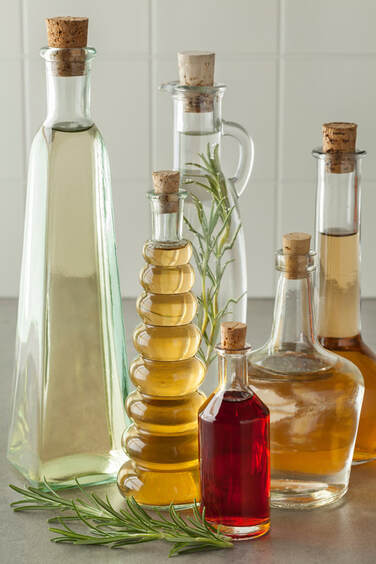 Photo from Colorado State University Vinegars & OilsHerbal vinegars and herb-infused oils are excellent ways to perk up salad dressings, marinades, and sauces. To make vinegars, heat the vinegar until it is warm. Bruise the herbs and place them in a jar. Pour warm vinegar over the herbs and steep for two weeks in a sunny location. Herb-infused oils are made similarly, but they need to be refrigerated to prevent the development of bacteria. Use oils promptly.
by Judy Kautz, OSU Extension Master GardenerSince we are expecting a taste of cool Fall weather, don’t you have the desire to get into the spirit by decorating your home, specifically your front door? If you’re sick and tired of putting out the same old jack-o-lantern every single year, then take your front door decor to the next level this season with one of the beautiful and creative ideas shown below. Whether looking to go simple and elegant with a small wreath of autumn leaves or wanting to extend your decorations onto your porch and maybe even down your walkway, there is something here for absolutely everyone. If you’ve got limited space or are more minimalistic in your decor preferences, then all you really need to make your home cozier and seasonally inspired is something to hang on your front door. This could be a small wreath or some type of floral, harvest corn, and pine-cone arrangement. If hanging something on your door isn’t an option where you live but you’ve got a little bit of porch room, a simple floral arrangement of mums with pumpkins could really go a long way in warming up that space. Alternatively, if you are enthusiastic about decorating this season and want to go all out, you could completely transform the front of your home into an autumn dream. Pumpkins, bales of straw, potted plants, scarecrows, and fall leaves can all be used together to complete the look you desire. Here are some specific ideas.  If you want to go all out this fall, use straw bales, pumpkins, gourds, and mums! Place a bale of straw on both sides of your largest step with a large pumpkin on each one. Arrange potted mums and gourds around the straw bale and down the steps, keeping both sides symmetrical for a walkway feel. Tie the look together with corn-stalks on both sides of your door and a hanging wreath. There is also something to be said for sticking with the basics. If you’ve got a small table you can set on your porch, place a bouquet of sunflowers and autumn leaves on it. Surround the flowers with small pumpkins and gourds, and arrange your larger pumpkins around the table. It’s amazing how much you can transform the front of your home by simply accenting your door frame. A great way to do this is by draping garland made of autumn leaves, pine-cones, and sunflowers around the front double doors. This look works well with matching wreaths. If you’ve got a cooler-toned or more modern-looking home, a few large pumpkins and some bright yellow mums are a great option for a more classic decor. Scatter them sparsely around your porch and stairs if you’re more minimalistic. An added rocking chair makes this the perfect place to sit on a fall day.  For a simple display, place two potted mums, one yellow and one orange, to the side of your door. Next to them, lay down some brightly-colored leaves underneath a few pumpkins. If you have limited porch space, hang a small wreath made of muted fall leaves on your front door for a simple yet elegant appearance. Or if the more traditional floral wreath just isn’t for you, try hanging a wreath of cranberries on your front door. This bold pop or color is festive and looks great with a bright yellow bouquet in a distressed and rustic vase. Arrange candles and apples around the display. If your house has stairs to the front door, line either side of the staircase with varying size pumpkins and dried harvest corn. At the bottom of the stairs, continue the stacked look with bales of straw. Or if you like the idea of floral arrangements in pumpkins, don’t be afraid to experiment with different flowers. Mums and sunflowers aren’t your only options. Try using orange and white pumpkins to display flowers such as warm-colored roses and even chrysanthemums.  If you prefer just flowers, nothing offers more color on your front steps than a variety of striking mums. To accomplish a stately look this season, use some large stone vases to home mums, ferns, and even large pine-cones. Two simple pumpkins on either side of the door and a hanging straw and pine-cone arrangement pull the look together.
A few bales of straw with bright yellow and purple mums are made even cheerier with a couple of happy scarecrows and gourds. This is a wonderful option for families with children and makes your home appear friendly and welcoming. However, if you’re not into pumpkins, scarecrows, and straw bales, you can brighten up your staircase this fall simply with some potted plants. Leafy ferns, purple flowers, and classic mums are beautiful. Classic, modern, simple or elaborate, there is an option for everyone when it comes to fall decorating! by Judy Kautz, OSU Extension Master GardenerThere are many reasons to grow your own garlic. First, it’s really easy to do. It is a good idea for new vegetable gardeners to include a patch of garlic. The plants are bothered by few pests and diseases; even the deer and rabbits that nibble on other crops rarely venture into the garlic patch. It’s also extremely low maintenance, requiring little fussing during the growing season. The best reason to plant garlic, however, is flavor. Home grown cloves are packed with a depth of flavor that you’ll never find with supermarket varieties. 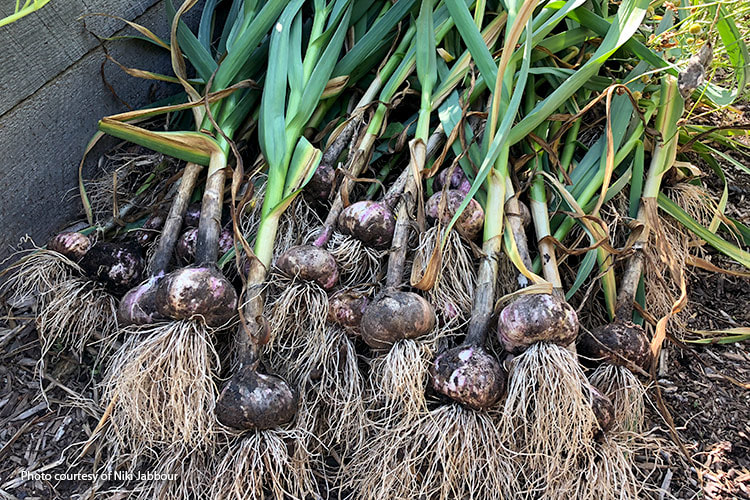 Garlic plants are bothered by few pests and diseases; even the deer and rabbits that nibble on other crops rarely venture into the garlic patch. And while garlic cloves can technically be planted in early spring, autumn is the best time to plant if you want really big bulbs. Time your planting for about four to six weeks before the ground is expected to freeze (traditionally around Halloween). This gives the cloves time to set roots before the arrival of winter. Niki Jabbour of Garden Gate magazine gives us an excellent summary on growing garlic. 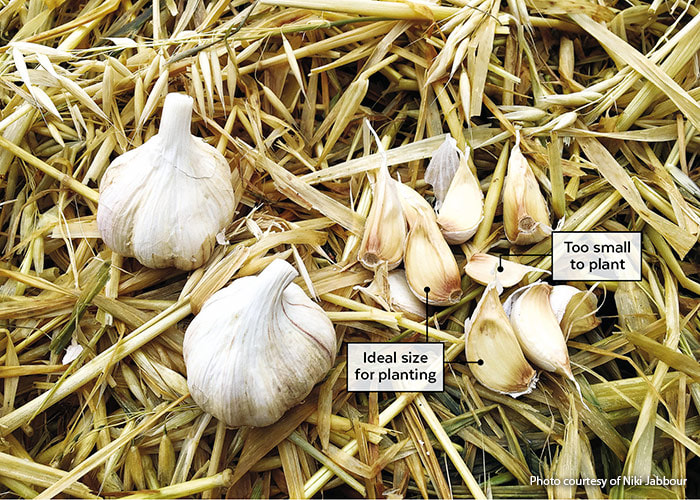 For big bulbs, garlic is best planted in autumn, about four to six weeks before the first expected frost. Break apart the cloves and sort them - the biggest for planting and the rest for the kitchen. Garlic can be grown almost anywhere in North America, from USDA zone 2 and warmer, although certain varieties do better in very cold regions. There are two main types of garlic: hardneck and softneck. Hardneck garlic produces a long flowering stalk, called a “scape,” in early summer. Beneath the soil, a single row of cloves develops around this central stalk. Hardneck garlic produces fewer cloves per bulb than softneck varieties, but each individual clove is larger, and many believe it to be more flavorful. Hardneck types are also usually more winter hardy than softneck garlic and are therefore the garlic of choice for short-season gardeners. Once harvested and cured, hardneck garlic stores for up to six months. 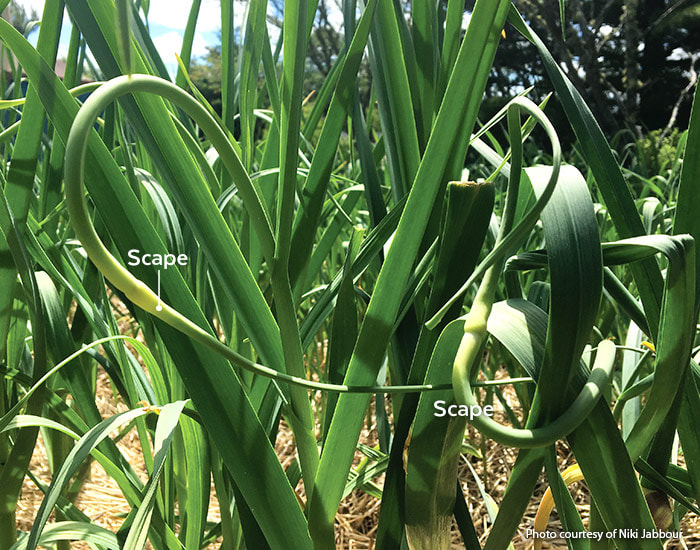 Clip hardneck garlic scapes when they look like this to get bigger garlic bulbs. Softneck garlic is not usually as winter hardy as hardneck garlic and is often grown in milder regions. The bulbs are packed with cloves — sometimes more than 20 in a bulb! — that range in size from small to large. They do not produce a central scape, but instead have soft, flexible stems and leaves. This is why you’ll sometimes see softneck garlic braided for storage. And speaking of storage, softneck garlic stores very well, with the cloves remaining firm and flavorful for up to a year.
Where do you buy garlic for planting? There are three places to buy garlic for planting: your local garden center, the farmers market or an online catalog. Don’t buy garlic from the supermarket, as it may not be the right type for our climate and could also have been treated with a sprout inhibitor. If buying garlic locally, choose plump bulbs with no brown spots or mold. As long as bulbs were grown locally, any you buy at the farmers market will be fine in your garden. When choosing garlic to grow, don’t be shy about trying different varieties. There are hundreds of hardneck garlic varieties and dozens of softneck ones available to gardeners. While all taste like garlic, there are subtle flavor and pungency differences between types and varieties. How do you grow your own garlic? Garlic grows best in a site with at least six hours of sun each day. It also needs well-draining soil. Before planting, loosen the soil and dig in 1 to 2 inches of compost or aged manure to improve the soil. Once the garden is prepped, gently break the bulbs into individual cloves. Separate varieties into different containers. Don’t plant naked cloves! Leave the papery covering intact when you plant as it protects the cloves from potentially damaging microbes. Does clove size matter? The smallest cloves won’t size up into large bulbs. Set these aside to be taken to the kitchen. Also take a close look at the largest cloves: Sometimes you can see that they’ve split in two within their papery husk. If planted, they’ll form two side-by-side plants and this can result in stunted bulbs. So also toss large split cloves into the kitchen basket. Plant garlic in a grid pattern, spacing the cloves 6 inches apart and planting them 2 to 3 inches deep. After the bed has been planted, water well and top dress with a slow-release organic bulb fertilizer. Then mulch the soil with a 3-inch-deep layer of shredded leaves or straw. This reduces weed growth and insulates the bed for winter. Caring for your garlic should include feeding. As the weather warms in spring, you’ll notice green garlic shoots emerging from the mulch. At this point, apply a balanced granular organic fertilizer. Garlic appreciates a steady supply of nutrients, and feeding the plants results in bigger bulbs. This initial feeding can be followed up with an application of a liquid organic fertilizer, such as fish emulsion, when the garlic scapes are removed (on hardneck types) in mid- to late spring. With regard to watering, if there has been no rain, deep water the bed once a week with 1 to 2 inches of water. You can use a watering wand to hand water or snake a soaker hose through your garlic patch. While garlic growing problems are rare, keep an eye out for white rot, a fungal disease that affects onions and garlic. The first sign is yellowing leaves or stunted growth with the bulbs failing to develop well. Crop rotation and buying disease-free planting stock are the best way to avoid white rot. No matter if you’re growing softneck or hardneck garlic, it’s time to harvest when half of the leaves have yellowed. Use a garden fork to loosen the soil and gently lift the bulbs. This reduces damage, which could shorten storage life. Brush off soil clumps clinging to the roots with your gloves. Before you store homegrown garlic, it needs to cure. Curing helps develop the flavor and prepare the bulbs for long-term storage. Here’s how to do it: Hang the plants, with the foliage still attached, in a room, shed or site that is out of direct sunlight, sheltered from rain, and well ventilated. A temperature in the range of 75 to 80 degrees F is ideal. If you have a laundry rack, use it to hang the bulbs. You can also lay them flat on a mesh screen or newspapers, flipping them over every day or two so they cure evenly for two weeks. After they’ve cured, clean the bulbs by trimming the leaves and roots. I leave a 2-inch stem and trim the roots to about 1 inch. I also remove the outer wrapper if it’s very dirty. Place the bulbs in a single layer in a box, basket or hang in mesh bags. Store garlic in a cool, well-ventilated room that is 60 to 65 degrees F. A dry basement is ideal, but you can also keep it in a pantry or storage room. If you don’t have a good spot to store garlic, you can freeze peeled cloves on a parchment-lined tray. Once they’re frozen, bag them up and store in the freezer. Given its essential status in the kitchen, every garden needs a patch of garlic. It’s easy to grow, reliable and delicious. No space for a veggie garden? Tuck garlic cloves in ornamental beds, where the pungent aroma of the plants may even chase away insects and critters. Give garlic a try! by Judy Kautz, OSU Extension Master GardenerNo flower can lift someone’s spirits quite like sunflowers. They are bright and cheery, and as warm and inviting as the sweet summer sun. With brilliant yellow petals, also known as “rays,” sunflowers have an unmistakable sun-like appearance that has made them a crowd favorite, especially in the summer months. Sunflowers come in a number of varieties—ranging from small to very large, from having yellow petals to red. However, there is more to sunflowers than meets the eye. While they are stunningly beautiful, they also are rich in history and meaning. Sunflowers symbolize adoration, loyalty and longevity. Much of the meaning of sunflowers stems from its namesake, the sun itself. These flowers are unique in that they have the ability to provide energy in the form of nourishment and vibrancy—attributes which mirror the sun and the energy provided by its heat and light. Sunflowers are known for being “happy” flowers, making them the perfect gift to bring joy to someone’s (or your) day.  Who can resist the cheery sunflower in the landscape! Sunflowers originated in the Americas in 1,000 B.C. and were then cultivated as a valuable food source for centuries. With the European exploration of the New World, the flower’s popularity spread, as the rest of the world began to appreciate its beauty and sustenance. Today, sunflowers remain a highly recognized flower, admired for their sunny charm and delightful disposition. These beauties are also still sourced for their seeds, as well as oils used for cooking and skin emollients. For a flower that reflects so many of the sun’s positive characteristics, it isn’t surprising that people enjoy basking in the sunflower’s warming glow so much. With bright blooms that go all summer, sunflowers are heat-tolerant, resistant to pests, and attractive to pollinators and birds. They make beautiful cut flowers and their seeds (and oil) are a source of food for birds and people! The sunflower (Helianthus annuus) is an annual plant with a large daisy-like flower face. Its scientific name comes from the Greek words helios (“sun”) and anthos (“flower”). The flowers come in many colors (yellow, red, orange, maroon, brown), but they are commonly bright yellow with brown centers that ripen into heavy heads filled with seeds. Sunflowers are heliotropic, which means that they turn their flowers to follow the movement of the Sun across the sky east to west, and then returns at night to face the east, ready again for the morning sun. Heliotropism happens during the earlier stages before the flower grows heavy with seeds. There are tons of varieties of sunflowers available today, so there’s bound to be one that fits your garden. Choose between those with branching stems or single stems, those that produce ample pollen for pollinators or are pollen-free (best for bouquets), those that stay small or tower above the rest of the garden, or those that produce edible seeds! A fairly fast-growing flower for their size, most sunflower varieties mature in only 80 to 95 days. The largest sunflower varieties grow to over 16 feet in height, while smaller varieties have been developed for small spaces and containers and rarely grow larger than a foot tall! The flower heads can reach over 12 inches in diameter within the large seeded varieties. 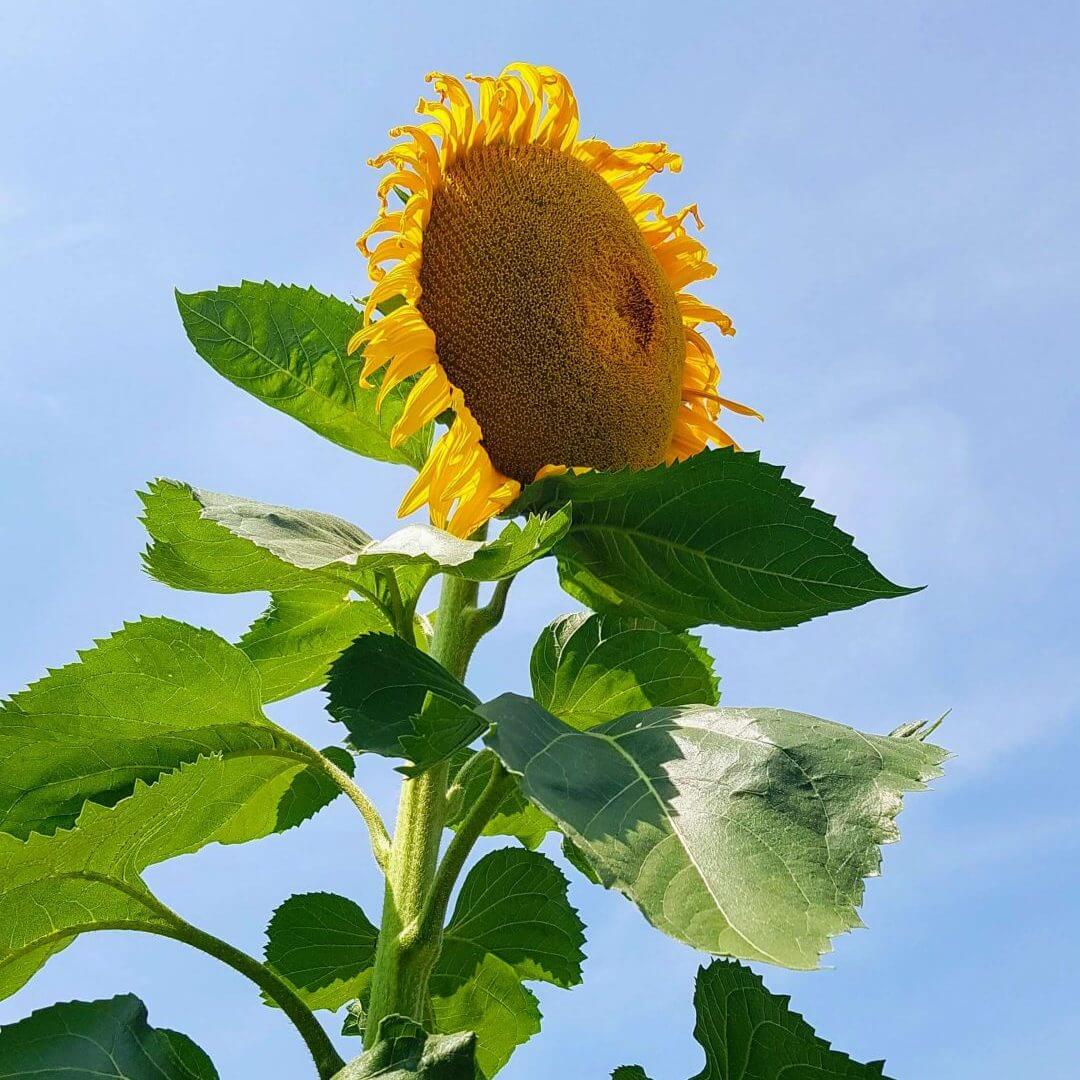 'Mammoth' is the traditional giant sunflower, sometimes growing to more than 12 feet tall. When planting sunflowers, first and foremost, find a sunny spot! Sunflowers grow best in locations with direct sunlight (6 to 8 hours per day); they require long, warm summers to flower well. Choose a location with well-draining soil. The planting spot shouldn’t pool with water after it rains. Otherwise, sunflowers aren’t too picky about soil, but for the best results, it shouldn’t be too compacted. They have long tap roots that need to stretch out; in preparing a bed, dig down 2 feet in depth and about 3 feet across. Sunflowers are heavy feeders, however, so the soil needs to be nutrient-rich with organic matter or composted (aged) manure. Or, work in a slow release granular fertilizer 8 inches deep into your soil. If possible, plant sunflowers in a spot that is sheltered from strong winds, perhaps along a fence or near a building. Larger varieties may become top-heavy and a strong wind can be devastating. Sunflowers are a diverse bunch! Here are a few varieties you may want to try: The towering ‘Mammoth’ variety is the traditional giant sunflower, sometimes growing to more than 12 feet tall. Its seeds are excellent for snacks and for feeding the birds, too. ‘Autumn Beauty’: One of the most spectacular cultivars, the ‘Autumn Beauty’ has many 6-inch flowers in shades of yellow, bronze, and mahogany on branching stems up to 7 feet tall. ‘Sunrich Gold’: A great flower for bouquets and arrangements, this sunflower grows to be about 5 feet tall and produces a single 4- to 6-inch flower. The big, no-mess, pollenless flowers have rich, golden-yellow rays and green-yellow centers. ‘Teddy Bear’: Just 2 to 3 feet tall, this small sunflower is perfect for small gardens and containers. The fluffy, deep-gold, 5-inch blossoms last for days in a vase. Sunflowers make wonderful bouquets, but here are a few tips: 1) For indoor bouquets, cut the main stem just before its flower bud has a chance to open to encourage side blooms. 2) Cut stems early in the morning. Harvesting flowers during middle of the day may lead to flower wilting. 3) Handle sunflowers gently. The flowers should last at least a week in water at room temperature. 4) Arrange sunflowers in tall containers that provide good support for their heavy heads, and change the water every day to keep them fresh. Fall is a prime time for sunflowers; enjoy them to the fullest!  Autumn Beauty has many 6 inch flowers in bronze and mahogany.
by Judy Kautz, OSU Extension Master GardenerOklahomans definitely have a love affair with our crape myrtles; in many areas you can see them on practically every street. And why not? Few plants can match the crape myrtle’s spectacular summer flowers, colorful autumn foliage and attractive sculptured wood. Known as the “lilac of the South” they are truly versatile plants; here are some tips if you are thinking about adding a crape myrtle to your landscape. Crape myrtles, Lagerstroemia indica, have many landscape uses: planted together, they make a great hedge or screen for your yard, while a single plant can create a distinctive focal point in a garden bed. Crape myrtles also make wonderful foundation plants around your house. Summer is a great time to buy crape myrtles because it is easy to see bloom color. However, pay careful attention to the tag on the plant to make sure it is the right size for your garden. These plants range from less than 3 feet tall to cultivars that may reach 30 feet! Choose the right size plant for your needs, avoiding buildings and power lines if you plant larger types. Medium selections from 12 to 14 feet are perfect for a small courtyard, and dwarf selections look lovely in containers or perennial beds. When you plant, remember that crape myrtles love sun and will not bloom without plentiful sunshine. For planting, early spring through September are optimum times, because these plants love heat. In our hot summer soils, they will respond by growing vigorous roots. However, as the soil cools in the fall, root development dramatically slows. If you plant crape myrtles after early October, they may dehydrate and die during the winter. When planting, water your crape myrtle well before you place it in the ground, and keep it watered during hot periods. Mulch to conserve moisture and reduce weeds, and apply a general fertilizer; make sure you follow the recommended directions for use that are marked on the container. If you already have established crape myrtles in your landscape, you may be wondering about how to prune them. Some gardeners don’t prune them at all, but many do prune after the plants have bloomed. After crape myrtles bloom, they set seed and the small round seed pods may look unsightly or weigh the limbs down. You certainly can trim these pods just below the clusters using sharp clippers. You may even get new shoots of growth and a second bloom before frost after pruning! You may also want to remove the shoots from the base of the plant, especially if you want a tree-like appearance. 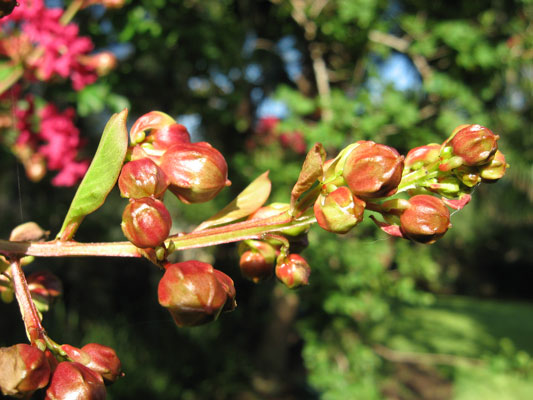 Crape myrtle seed pods may be pruned to improve appearance, byt they may also be left on the plant. Powdery mildew is the main disease concern of crape myrtles, but there are many disease-resistant cultivars available, thanks to the efforts of the National Arboretum breeding program and the research of Dr. Carl Whitcomb. Dr Whitcomb has also created hybrids with new and enhanced colors, drought tolerance and cold hardiness, including the ever-popular, bright red Dynamite. If you do develop powdery mildew on your plants, you can spray the foliage with a fungicide like Fertilome for this purpose. There are several fungicides available at your local garden center. 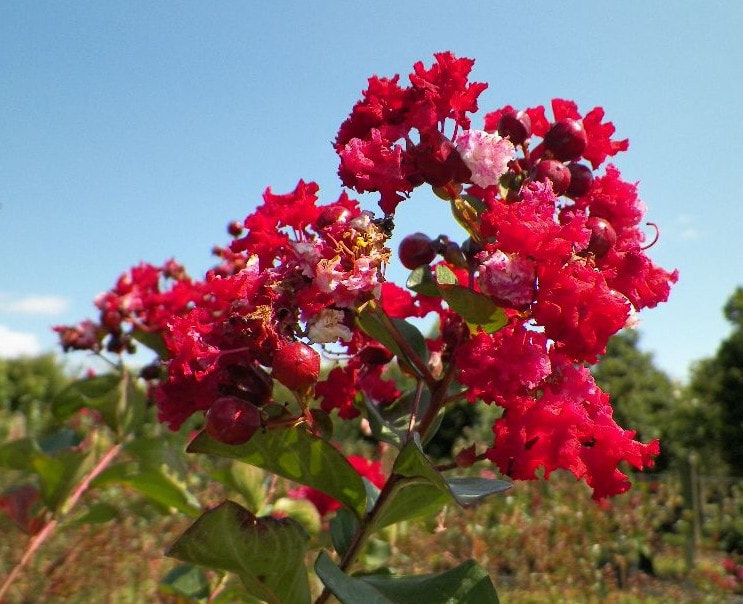 The Dynamite crape myrtle, developed by Dr Carl Whitcomb, is one of the most popular because of its deep red color and disease resistance. Crape myrtles are lovely in our gardens and they are relatively low maintenance and disease-resistant. For that deep red beauty in summer, try Dynamite or Red Rocket, and for a burgundy red, try Siren Red! All these varieties are medium-sized cultivars that grow from 10 to 15 feet. For beautiful pinks, try Rhapsody in Pink or Pink Velour, also medium sized plants. There are many, many other varieties and colors available, so plan to add one of these lovelies to your garden this year! You will be so glad you did!  The Pink Velour variety sports brilliant pink blooms that develop all summer.
|
Welcome to Dishing the Garden Dirt!
|
 RSS Feed